
Settings
Wi-Fi, network, DMX, outputs, device configuration, backups, and diagnostics, grouped into tabs across the top of the page. Unlike the other pages, nothing here is captured or recalled by Scenes; these settings define how the pole is wired and addressed.
What each tab does
Seven tabs, in the order they appear across the top of the page. The risk comes first in each card, because two of these tabs can leave you unable to see the pole or unable to reach the player.
polefx.local, and an optional second IP on the Ethernet port.
DMXSafe to change. Switches DMX input on and sets the first channel a lighting console drives.
OutputsCan blank or scramble the pole. How rendered frames are addressed to the physical LEDs.
DevicesSafe to read. The poles the player has heard from, and their firmware. Update writes new firmware to a pole.
SystemRestore replaces everything. Your release and feature channel, and the backup file that rebuilds this unit.
DebugRead only, nothing to break. Live diagnostics and the raw configuration, worth copying into a support request.
Your version
 1
2
3
1
2
3
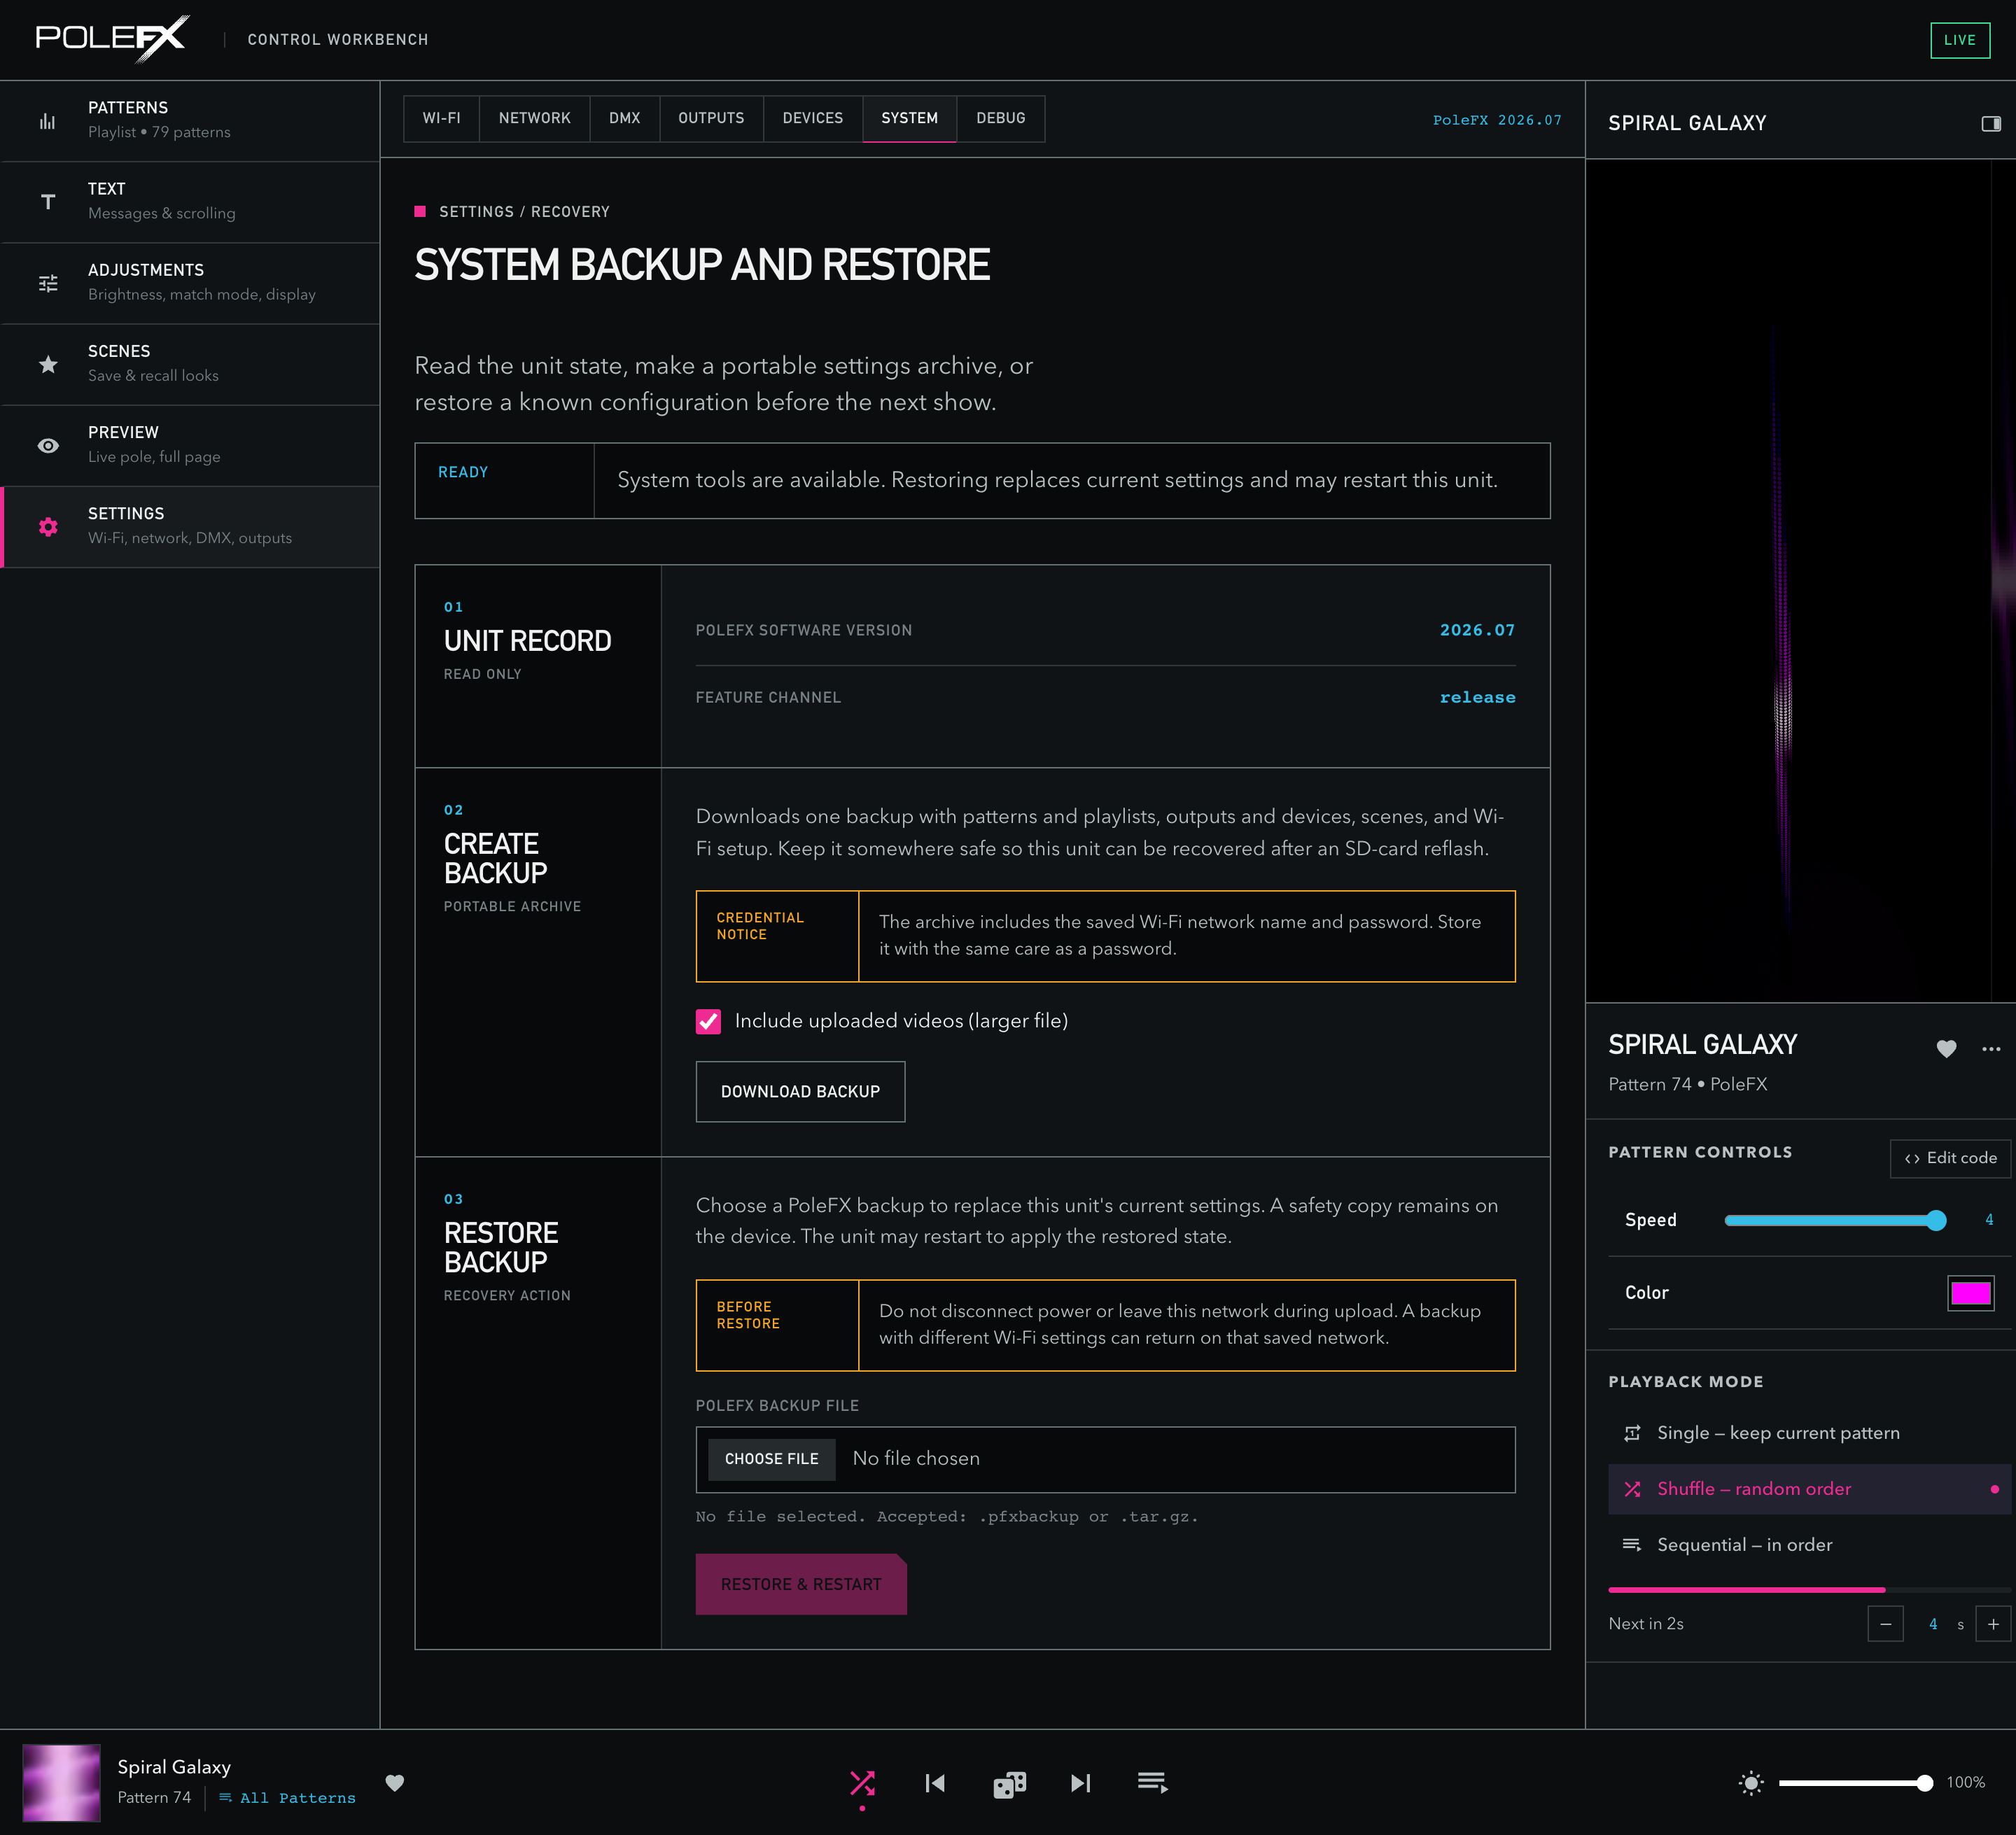
- Tab row The release, on every Settings tab. This is the quickest place to read it.
- PoleFX software version The same number, in the Unit record card. Quote it when you ask for support, and check it against the release these docs are published for.
- Feature channel Reads
releaseon a player as it ships. It is shown on every player so that a support call can confirm it in one look.
Wi-Fi
How the player joins or creates a network.
 1
2
3
4
5
6
7
8
9
1
2
3
4
5
6
7
8
9
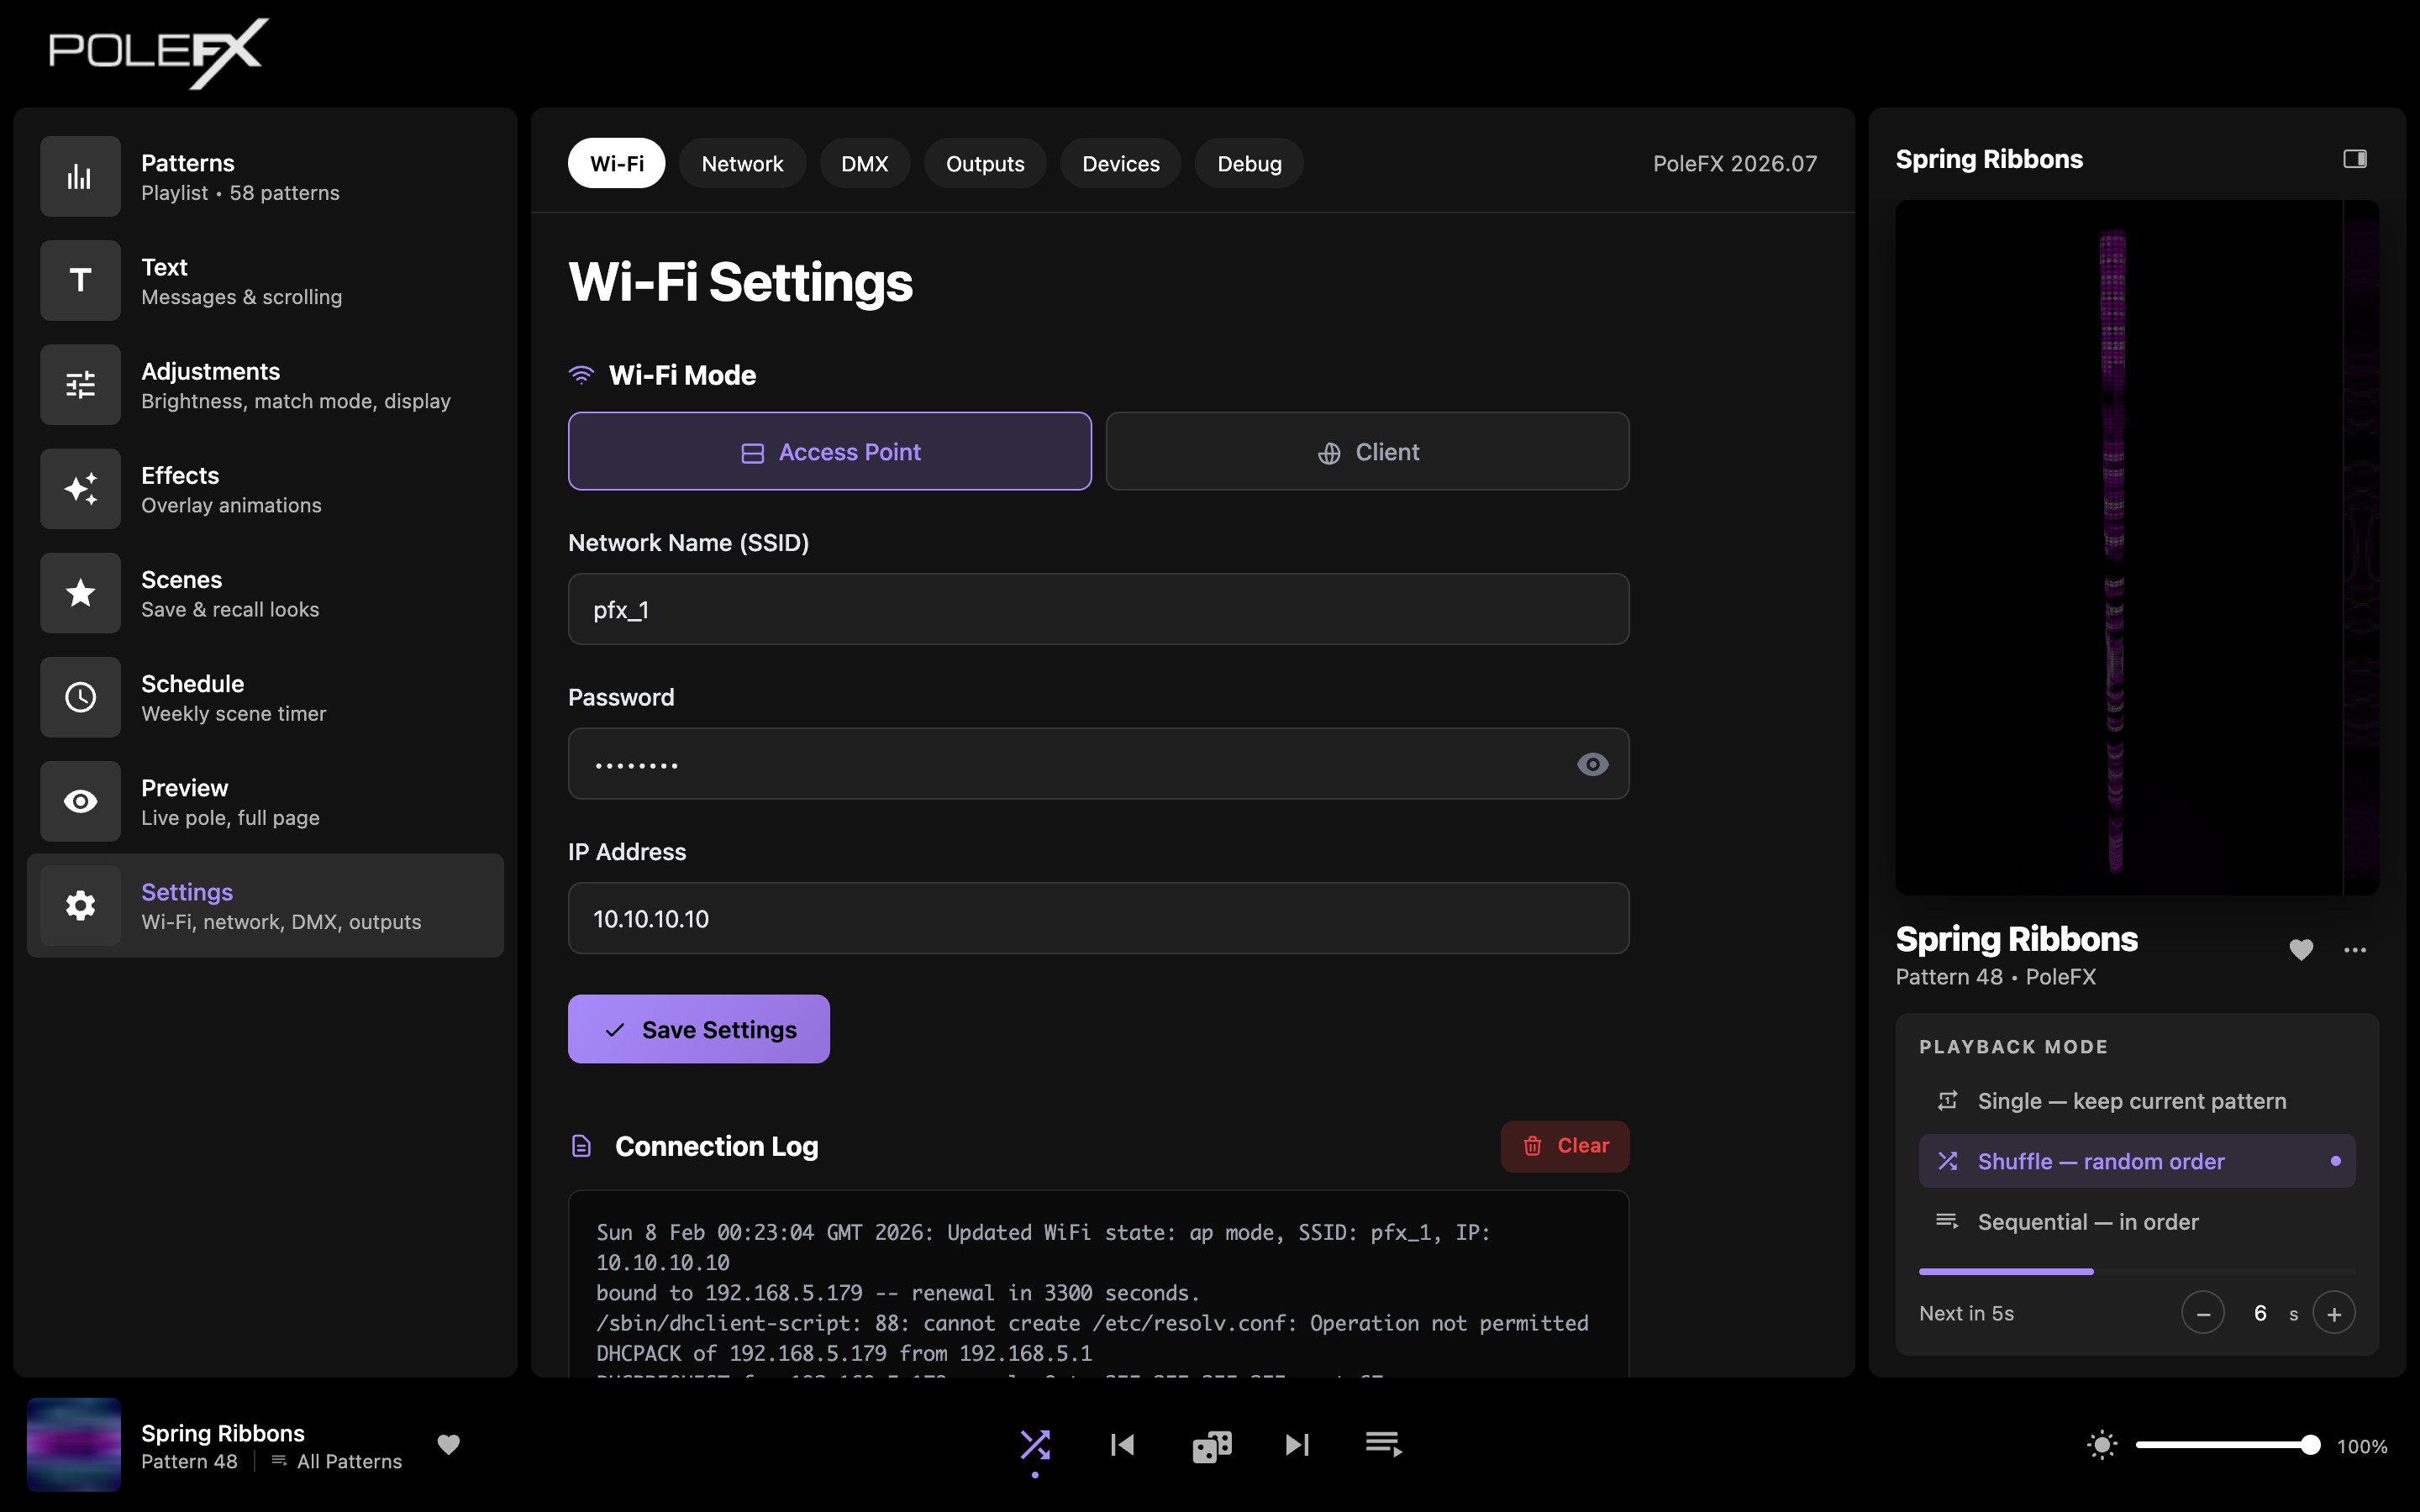
- Mode Access point makes the player broadcast its own network for you to join directly. Join network joins a network you already have, and is what this shot is set to. The step below changes with the mode.
- Scan networks Lists the networks the player can hear, so you can pick one instead of typing its name. It reads No scan run yet until you press it.
- Network name (SSID) The network to join, or in Access point mode the one to create.
- Show Reveals the password box beside it. A saved password is not shown back to you: the box reads Saved password unchanged until you type a new one.
- IP configuration DHCP (automatic) or a static address. Static adds a Static IP address box under it. In Access point mode this step is a single Controller address box instead, which starts at
10.10.10.10. - Save Wi-Fi settings Applies the change. It confirms the save and tells you to watch the state below; it does not promise the network worked.
- Current Wi-Fi state What the player asked for against what it got: Requested, Actual, the network, and the Wi-Fi address. Two rows that disagree are the fastest sign that a save did not take.
- Connection log Timestamped lines describing what the player did after you saved: stopping network services, setting up the access point, the name and address it ended on. Newest event first.
- Clear log Wipes the log. Nothing about the network changes.
The shot is Join network mode. Switching to Access point replaces Scan networks and IP configuration with a single Controller address box, which is the address the player will answer on.
What each mode asks for
Which mode suits your venue is answered on the Network page. This is the other half of that question: what the form wants from you, and which network you have to be on when the player comes back.
- What you fill in
- Network name (SSID), Password, and Controller address. All three are required. The address is the one the player will answer on, and it starts at
10.10.10.10. - What Save Wi-Fi settings does
- The player stops its network services and raises its own network under the name you typed. The page confirms the save and tells you to watch the log.
- Network you join afterward
- The player's own, under the name you just saved. If you changed that name, the old network stops existing and your phone does not rejoin on its own.
- Address to open afterward
- The Controller address you typed, which is
10.10.10.10unless you changed it.http://polefx.localworks as well. - If nothing comes back
- You are still inside the player's own network, so rejoin it and look again. The front panel shows the name and address the player actually used, under Network > Wi-Fi.
- What you fill in
- Network name (SSID), Password, and IP configuration, which is either DHCP (automatic) or Static address. Static address adds a Static IP address box under it. Scan networks fills the name in for you.
- What Save Wi-Fi settings does
- The player gives up its own access point and joins the network you named. The page warns you first, under Keep another recovery path: wrong credentials can leave the controller unreachable until local recovery.
- Network you join afterward
- The one the player joined. Your phone or laptop has to be on that network too, and the player's own network is no longer there to fall back to.
- Address to open afterward
http://polefx.local, or the address itself: the static one you typed, or with DHCP the one the network handed out, which the front panel shows.- If nothing comes back
- Read the front panel under Network > Wi-Fi, which is where the player says what it actually did. If that address answers nothing, Factory Reset > Settings on the front panel puts the factory Wi-Fi back, along with every other setting on the player.
Saving is one press in both modes, and in both modes the player can save happily and still end up somewhere you are not. Read Current Wi-Fi state, where Requested and Actual are printed side by side, then the log, then the front panel.
Network
 1
2
3
4
5
6
7
1
2
3
4
5
6
7
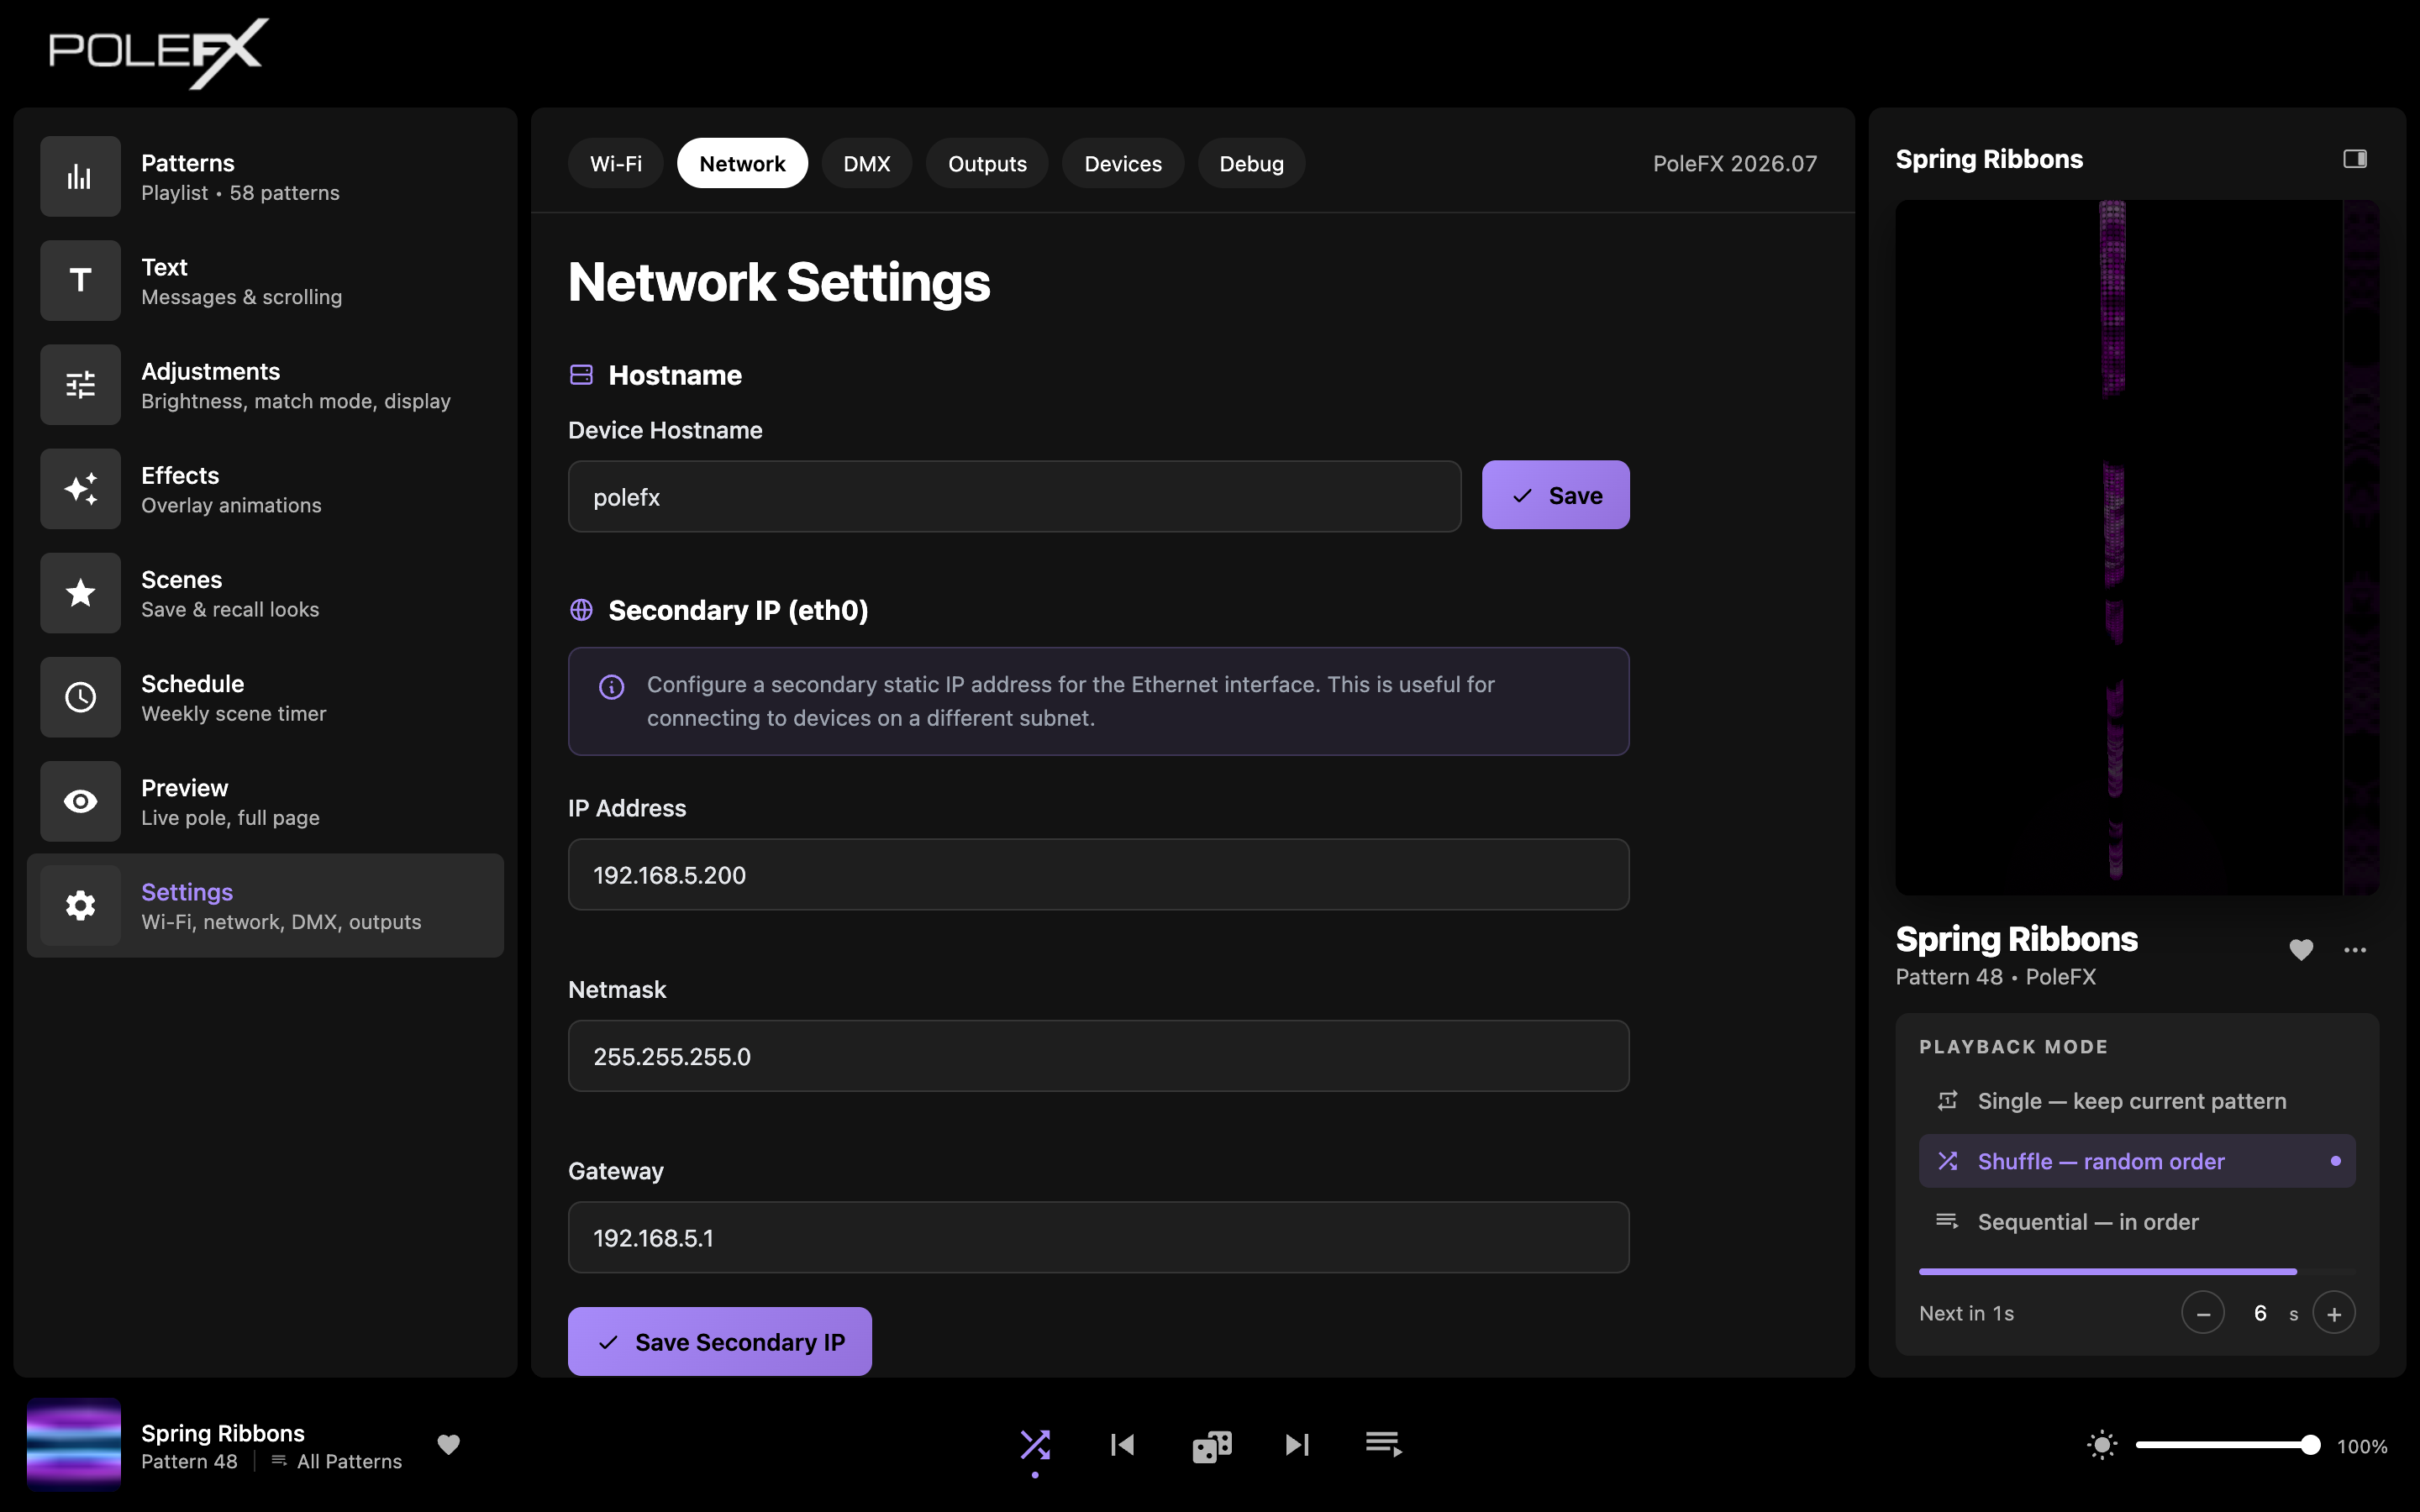
- Hostname The name the player answers to on the network, in the Device hostname card. The default is
polefx, which is what makeshttp://polefx.localwork. Change it and that address changes with it. The card shows the resulting name back to you as Current. - Save hostname Applies the hostname. It belongs to the hostname box only.
- Secondary IP An optional second static address on the Ethernet interface, for reaching devices on a different subnet. The poles do not need it. Leave all three boxes blank to clear it.
- IP address The second address itself.
- Netmask Which part of that address is the network.
- Gateway The router on that subnet.
- Apply secondary IP Applies the three boxes above it. Save hostname does not.
See Network for how the player, poles, and your control device fit together, and for the player's fixed Ethernet address.
DMX
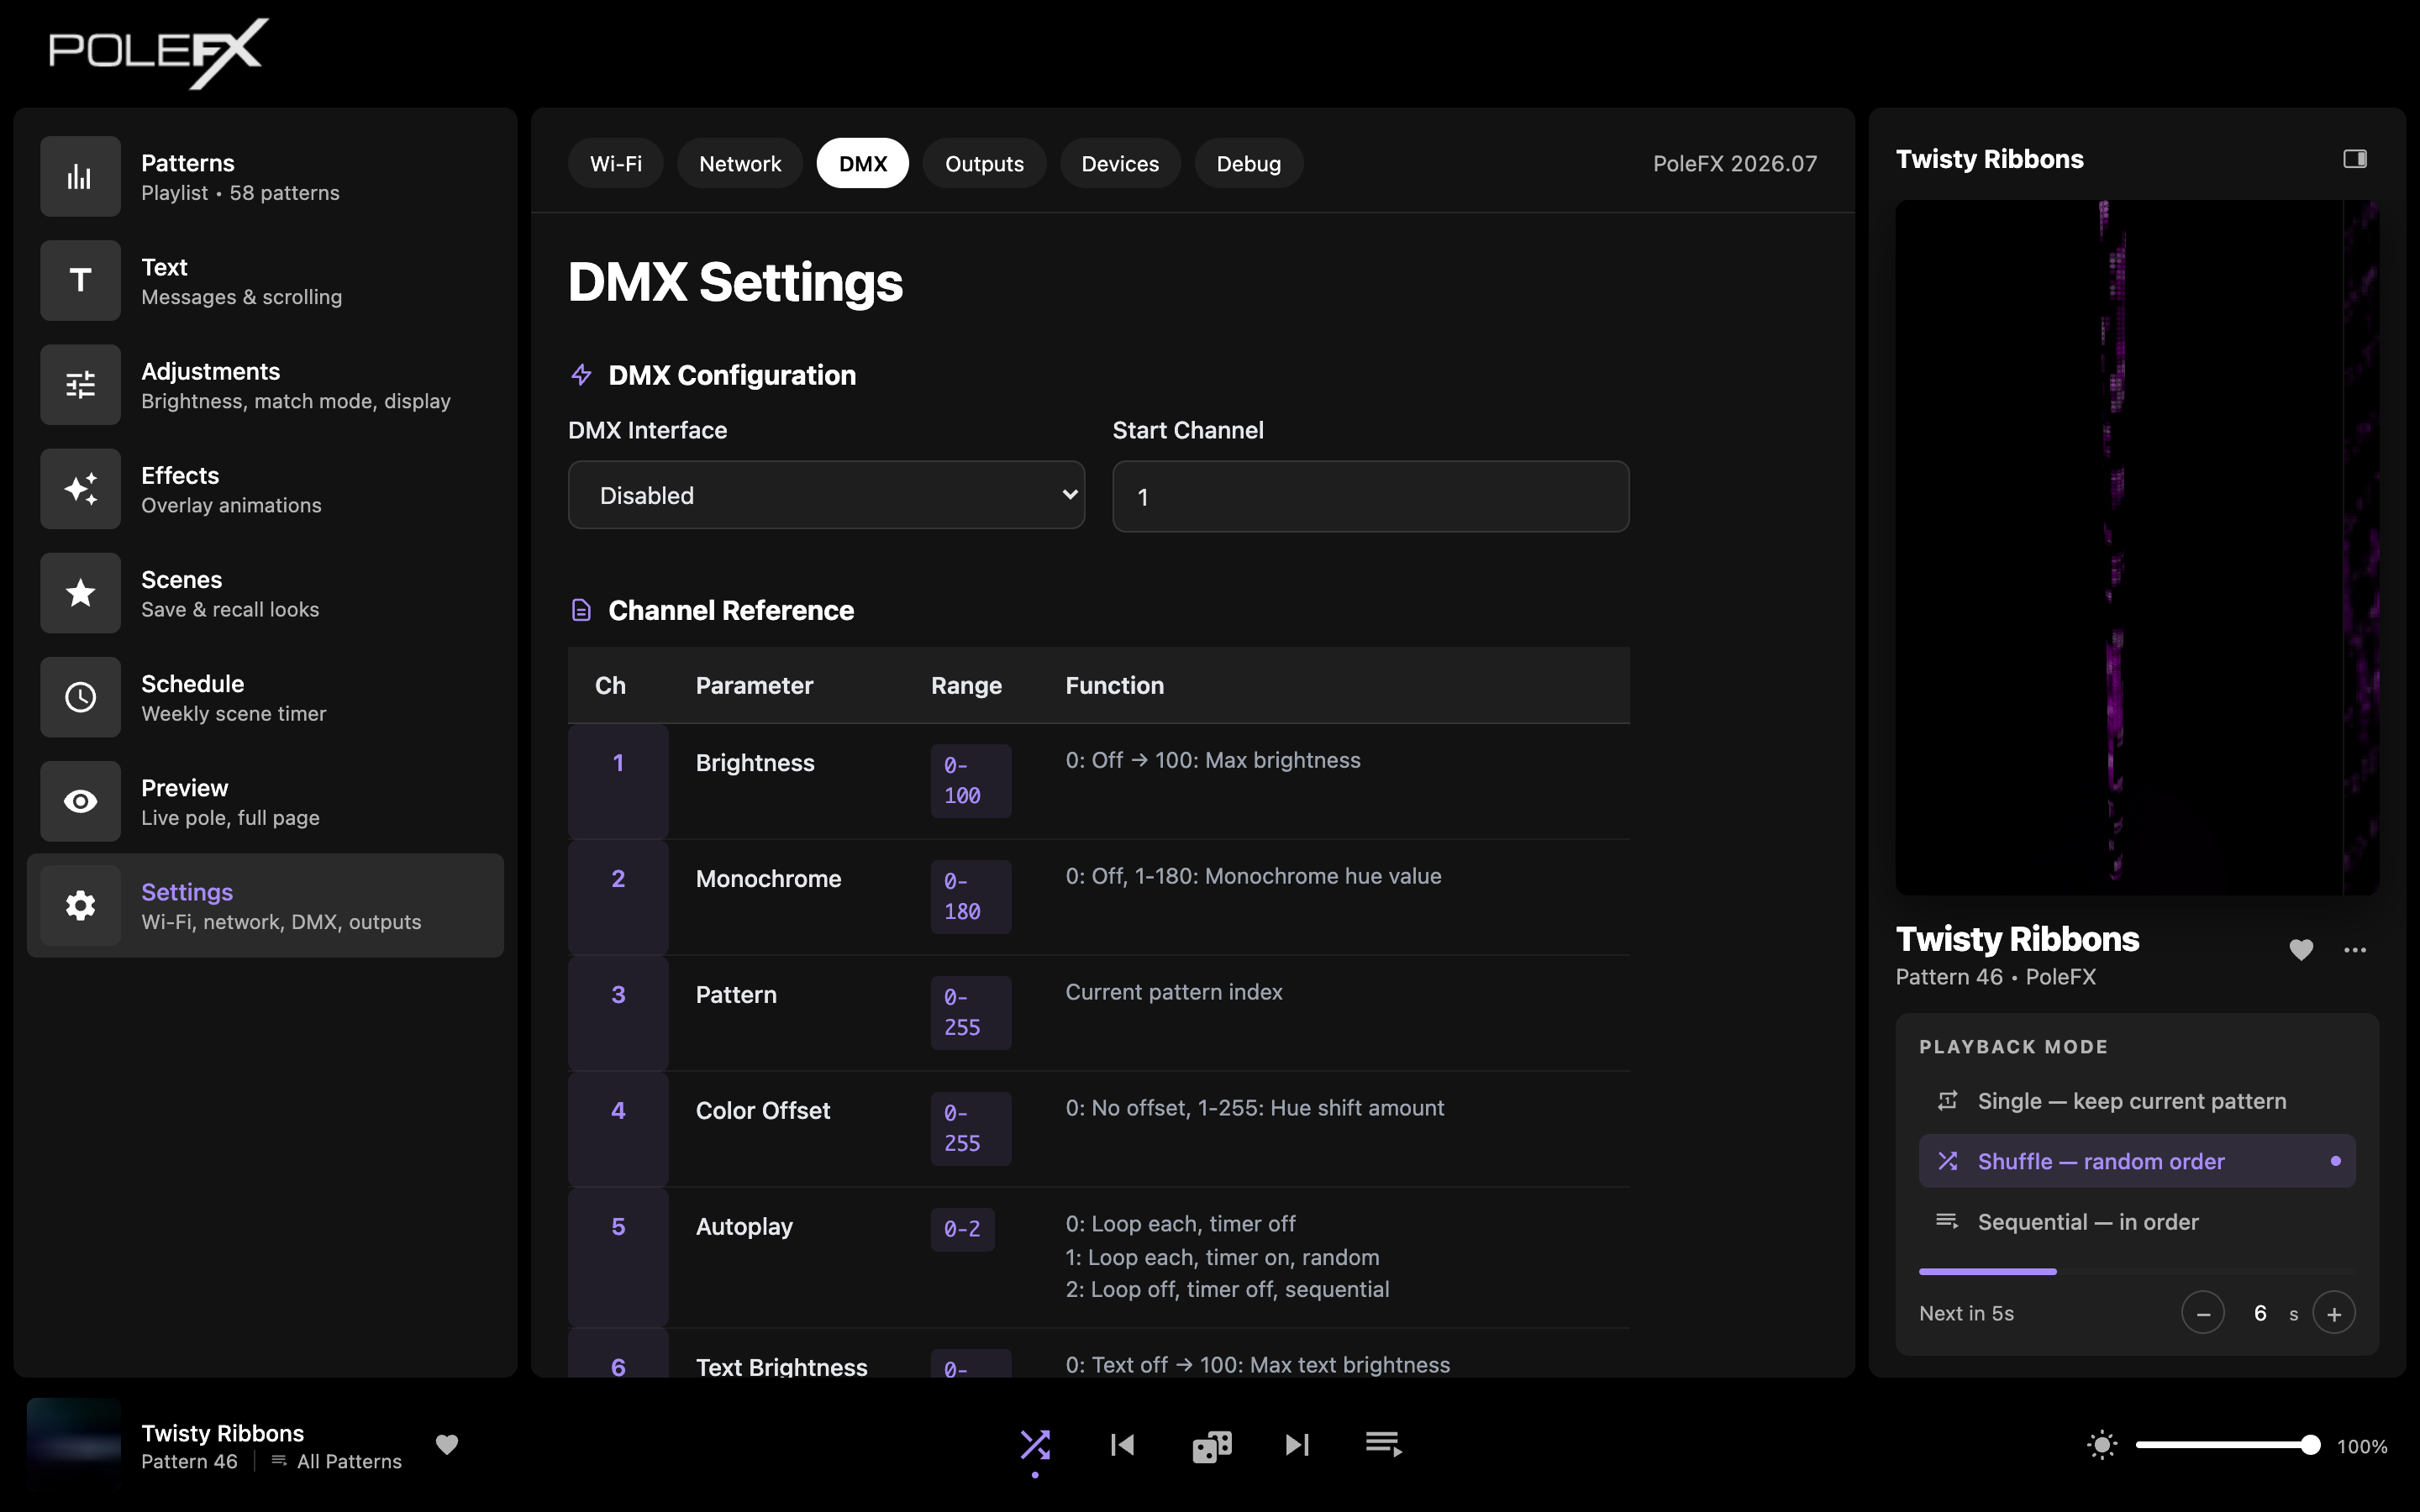
The third tab along the top, between Network and Outputs, headed DMX input workbench. Set up DMX input so a lighting console can drive the pole.
- DMX interface: enable or disable DMX input (Disabled by default).
- Start channel: the first DMX channel the pole listens on; the channels in the reference below are offsets from here.
- Channel reference: a read-only map of what each channel controls (Brightness, Monochrome, Pattern, and so on).
- Serial monitor: prints the incoming values while you patch. It costs performance, so leave it off for a show.
For full DMX setup, including the XLR pinout, wiring, every channel explained, and this tab annotated control by control, see the DMX Control page.
Outputs
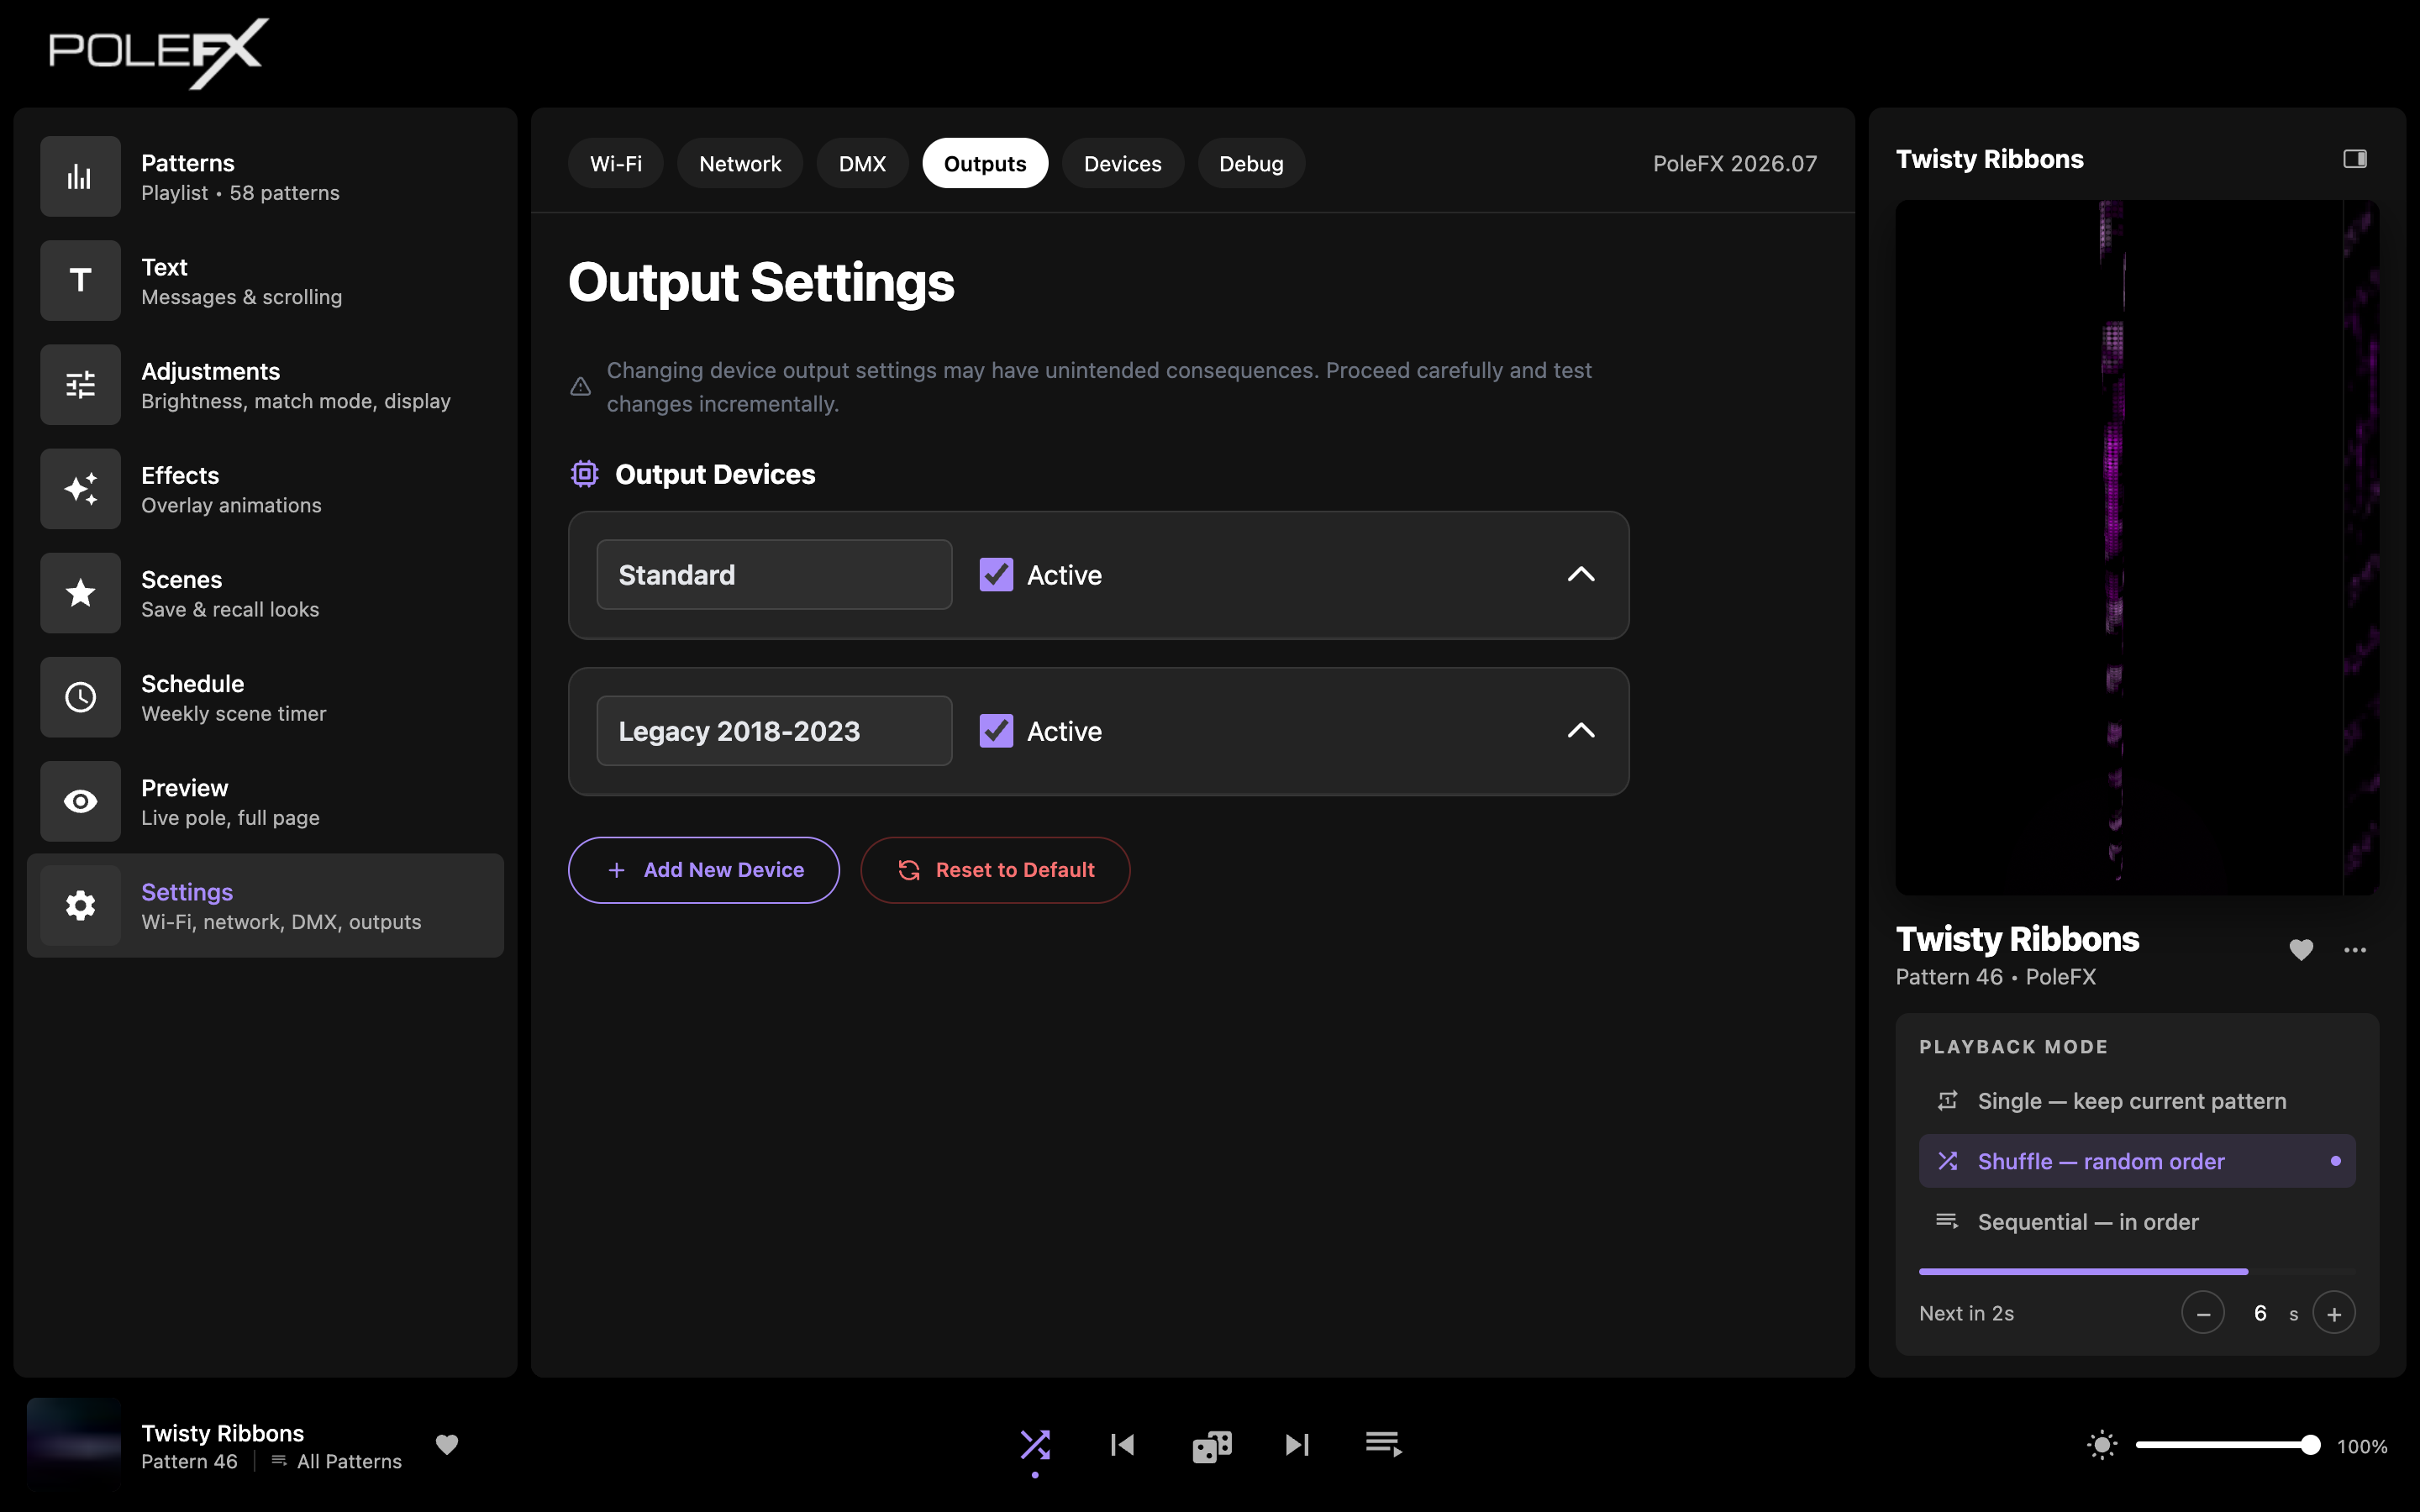
Maps the pole's physical LED layout: which output records are active and how the engine addresses their columns and pixels. The page is headed Output mapping workbench, and the rows sit under Output records.
These settings define how rendered frames are wired to the physical LEDs. The wrong layout can leave the pole blank or scrambled. Change one thing at a time and test, and use Reset to Default to return to a known-good state.
 1
2
3
4
5
6
1
2
3
4
5
6
- Live output The page's own warning. A committed field can change the pole feed at once, so change one thing, then look at the pole.
- Record name The box at the left of each row. It is a label for you, not an address; typing in it renames the record.
- Active Includes that record in the render. Only one record is switched on in this shot. A record that is not active is sent nothing at all.
- Arrow Opens that record's layout fields, which are collapsed here.
- Add New Device Creates another output record. The button keeps the older word for it.
- Reset to Default Puts the factory records back. It asks you to confirm first. This is the way out of a layout you cannot undo.
Opening a record with its arrow reveals the layout fields. The ones that decide what you see on the pole are Number of Strips, Strip Length, Display Length and Display Width, Strip Order (with the Remap tool beside it), and the Flipped, Mirrored, and Mirror Half wiring fixes. The record also carries the Protocol it speaks and the Unicast IP Addresses it sends to, which is what ties a record to a particular pole.
What a wrong layout looks like
Read the pole, then change the one setting that matches. These are descriptions, not photographs.
Start with Active: an inactive record is sent nothing. If it is active, check the record's unicast address against the address the pole reports on the Devices tab.
The picture is there but the strips are fed in the wrong order. Strip Order is that order, and Remap is the tool for rewriting it.
Flipped and Mirrored turn the whole picture. A pole that reads correctly from one side and backwards from the other is a wiring case: switch on Mirror Half and step Mirror Half Offset until the seam disappears.
Number of Strips, Strip Length, and Display Length describe the physical pole. If they do not match it, the picture is squeezed into the wrong space or stops partway up.
One continuous picture up the whole pole, reading the same way from every side. If you cannot get back to it, Reset to Default restores the factory records.
Devices
 1
2
3
4
5
6
7
8
1
2
3
4
5
6
7
8
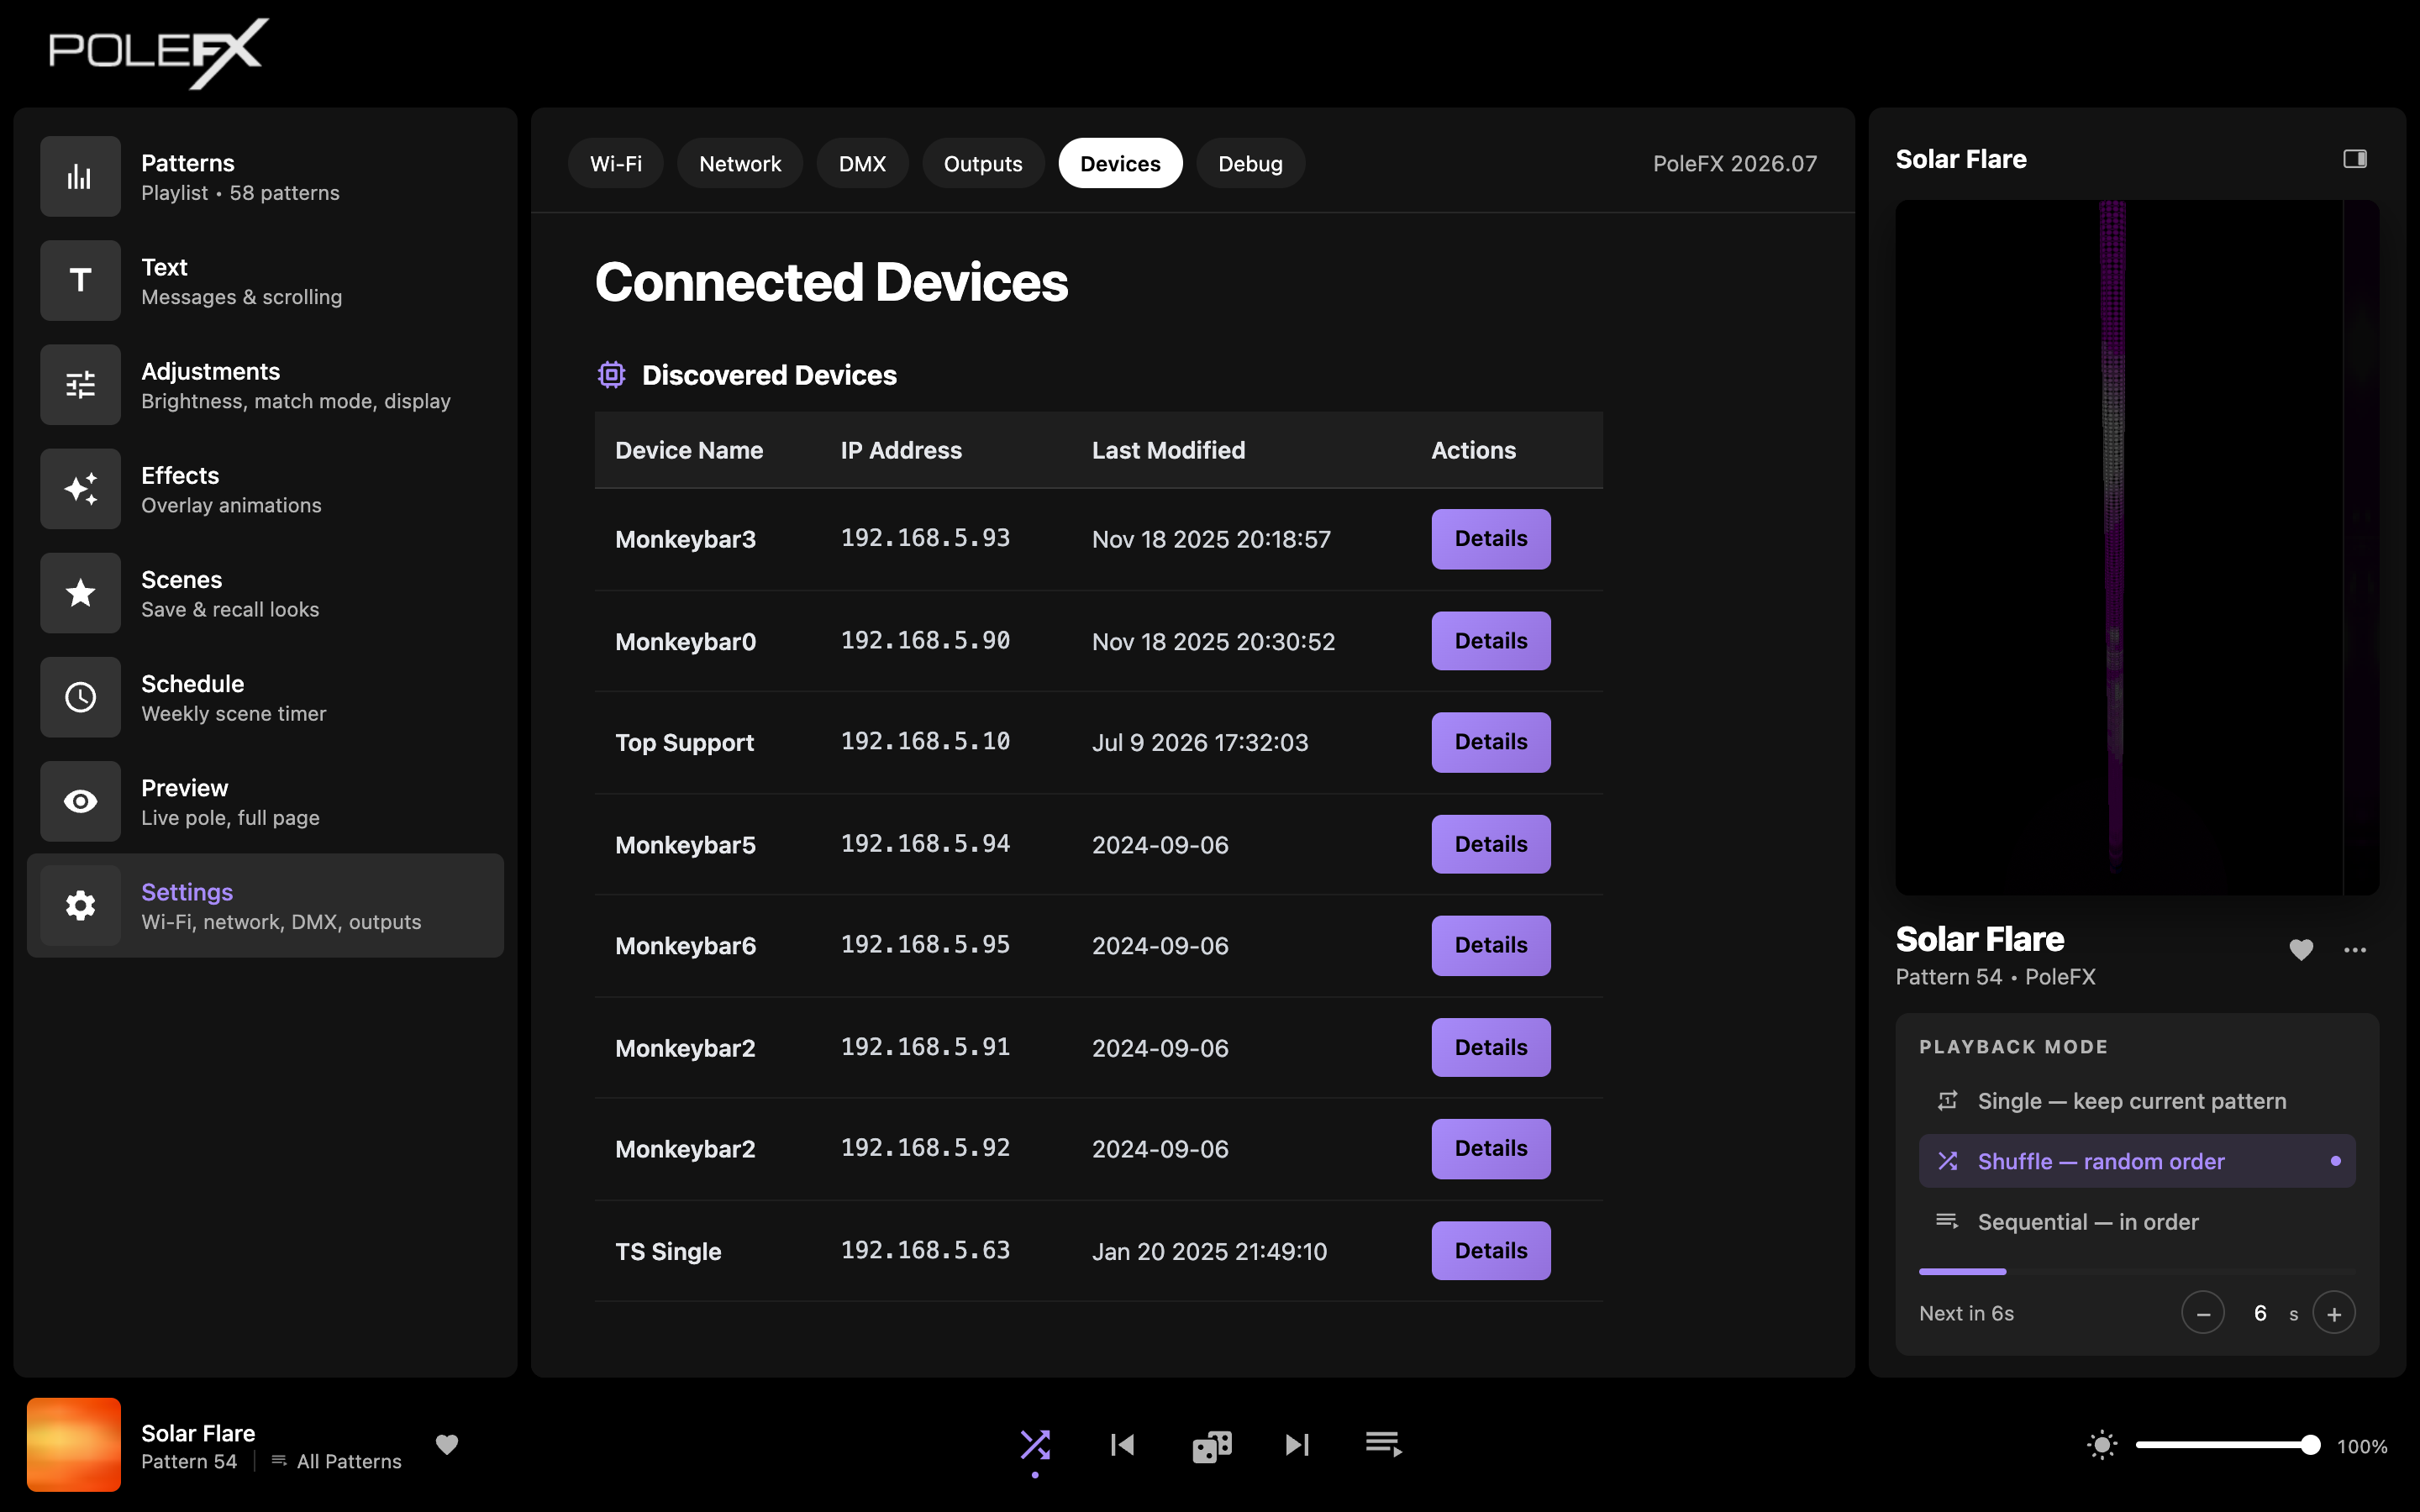
- Device Name The name the pole reports for itself.
- IP Address The address the pole is answering on. This is the address an output record has to send to.
- Last Modified A date the pole reports as part of its own settings. It is not a clock reading of when the pole was last heard from.
- Firmware The version the pole is running, its build, and its slot.
- Up to date The pole has a firmware version and it has been validated. A pole that reports no version at all reads Pre-OTA firmware instead and cannot be updated over the network.
- Update Sends the firmware selected in the library below to that one pole.
- Details Opens what that pole reports about itself: MAC address, netmask, gateway, and its strip and pixel counts. This is the panel to read before you change anything.
- Firmware Library Upload a pole firmware
.binhere first; Update above has nothing to send until you do.
With no poles found the table is replaced by a single panel: Listening for pole heartbeats while the player is still scanning, and No poles detected. Confirm power and that each pole is on this controller's network. once it has listened and heard nothing. The banner above the table says the same thing in one word, Scanning or No poles.
What Details shows
Details opens a panel under that pole's row, and pressing it again closes the panel. Everything in it comes from that one pole, so nothing you read here is a player setting.
MAC address, netmask, gateway, multicast IP, and report port. The MAC address belongs to the hardware rather than to the configuration, which is what makes it the way to tell two poles apart when they answer on the same address.
Strips, pixels, gamma, max power, and default RGB. Read these before you edit a layout: they are the pole's own count of its LEDs, and the output profile that feeds it has to agree with them.
Switches for DDP, sACN / E1.31 and Art-Net, the Start universe, and a Received so far count of packets and frames for each protocol. The pole is read once, when you open the panel, so Refresh is how you get a newer count. Full setup is on Pixel Streaming.
Edit Remote Settings asks for a PIN and then changes that pole's own settings, including its address. The idle mode and strip order tools below it write to the same single pole. None of this touches the player.
Firmware is not in the panel. The version, its build and slot, and the Update button are all on the row above. A pole that has reset because its supply sagged also shows a red Power: brownout resets section here, with a count and how long ago the last one was; that is a power fault, not a network one.
Save to pole, under the streaming protocols, says exactly what happened:
The change is written to the pole's own storage, so it survives a power cut. A new Start universe applies at once.
Turning a protocol on or off is the part that waits for a restart. Power that pole off and on, then open Details again to confirm the pole reports what you set.
The pole refused the whole change and applied none of it. The rest of the line is the pole's own reason, and it names the field it did not like.
Poles on firmware older than 2026.07 cannot report or change these settings, and the panel says so instead of showing controls that would do nothing. Update the firmware first.
The player cannot see a pole
-
If No pole is listed at all, only No poles detectedDo Follow the one network cable. It runs from the player's single Ethernet socket to the pole, or to a switch that the poles are on. Reseat both ends and wait: each pole announces itself twice a second, so a working link fills the table within a couple of seconds. Wiring is on the Network page.
-
If The pole is completely darkDo Treat it as power, not network. The pole has its own supply and takes nothing from the player. Unplug that supply, plug it back in, and watch the pole: a short purple flash means it has power. It shows at the top of a permanent pole and at the bottom of an aerial one. No flash means the supply or the cable to it, and nothing on this page will help.
-
If Other poles are listed and one is missingDo Swap the missing pole's network cable with a listed pole's at the switch. If the missing pole appears, the fault is that cable or that port. If it still does not, the pole's own address is the suspect: poles sit on the same
192.168.5.xrange as the player. -
If Two poles are powered but you only get one rowDo Suspect one address on two poles. The table is keyed by address, so two poles set the same one share a row. Open Details and watch the MAC address for half a minute: if it changes, two poles are answering there. Give one of them its own address from Edit Remote Settings in that panel, which asks for a PIN.
-
If A pole is listed that you unplugged or took awayDo Ignore the row, or restart the player to clear it. The list is everything the player has heard since it started, and nothing removes a row when a pole goes quiet. It is not evidence that the pole is there.
-
If The pole is listed here but stays darkDo The network is fine and the output is not. Open Outputs, check that a record is Active, then open it and check its unicast address against the IP Address shown for that pole above.
System
Your software version, and a full backup of everything you have set up. The page is headed System backup and restore, and the read-only Unit record card at the top is the figure under Your version.
What is in a backup
One .pfxbackup file holds everything that makes this unit yours, which is
also why it is not a file to pass around.
Patterns and playlists, outputs and devices, scenes, and the copies of earlier settings the player keeps for itself. This is what turns a reflashed SD card back into your player.
They have to be in the file, or a restored unit could not rejoin your network. It means the file is a password. Do not mail it, post it in a forum, or attach it to a support request.
Include uploaded videos (larger file) is ticked to start with. Clearing it makes a much smaller file that still carries every setting, so it is the one to take when you only want the configuration.
The player's own software ships with the image, so the backup does not carry it. Logs and temporary files are left out too. A backup is your settings, not a copy of the whole unit.
Each pole keeps its own settings in its own memory: its name, its LED geometry, its strip order, its protocols. Restoring a backup on the player changes none of that.
Take a backup
Do this after any setup session you would not want to repeat. The backup is what turns a reflashed SD card back into your player.
-
Open Settings, System
Scroll to Back Up Settings, under the About card.
You should see A description of what the file holds, and Include uploaded videos (larger file) already ticked.
-
Decide about the videos
Leave Include uploaded videos ticked for a complete backup. Clearing it makes a much smaller file that still carries every setting: your patterns and playlists, outputs and devices, scenes, and Wi-Fi setup.
You should see The tick change. Nothing else happens yet.
-
Press Download Backup
One press. The player builds the file and hands it to your browser.
You should see A line saying the backup is building and that the download starts automatically, then a file such as
polefx-backup-2026.07-20260811-1432.pfxbackupin your downloads. -
Put the file somewhere safe
Keep it off the player. A backup that only exists on the unit is no use the day the unit needs reflashing.
You should see The same file on a laptop, a drive, or wherever you keep it.
Careful The file contains your Wi-Fi network name and password, in order to be able to restore them. Anyone who has the file has those.
Restore from a backup
-
Choose the file
Under Restore From Backup, press Choose File and pick a
.pfxbackupfile.You should see The file name replace No file chosen.
-
Press Restore & Restart
This is the point of no return for the current settings, so the browser asks first.
You should see A confirmation asking whether to replace the settings on this unit and restart it.
Careful A copy of the current settings is kept on the device, but the fastest way back is your own backup. Take one before you restore someone else's.
-
Wait for the upload
The file uploads to the player, which checks it before applying anything.
You should see A progress bar, then a count of how many files were restored.
Careful A file that is not a PoleFX backup is refused and nothing changes. A backup made on a different release is restored anyway, with a line saying so.
-
Let it restart
The unit restarts on its own to finish. Leave the page open.
You should see A countdown while the unit restarts, then the page reloading itself.
Careful A backup taken on a different network brings the player back up on that network, not the one it is on now. Have the front-panel display handy to see where it went.
Debug
 1
2
3
4
5
6
7
1
2
3
4
5
6
7
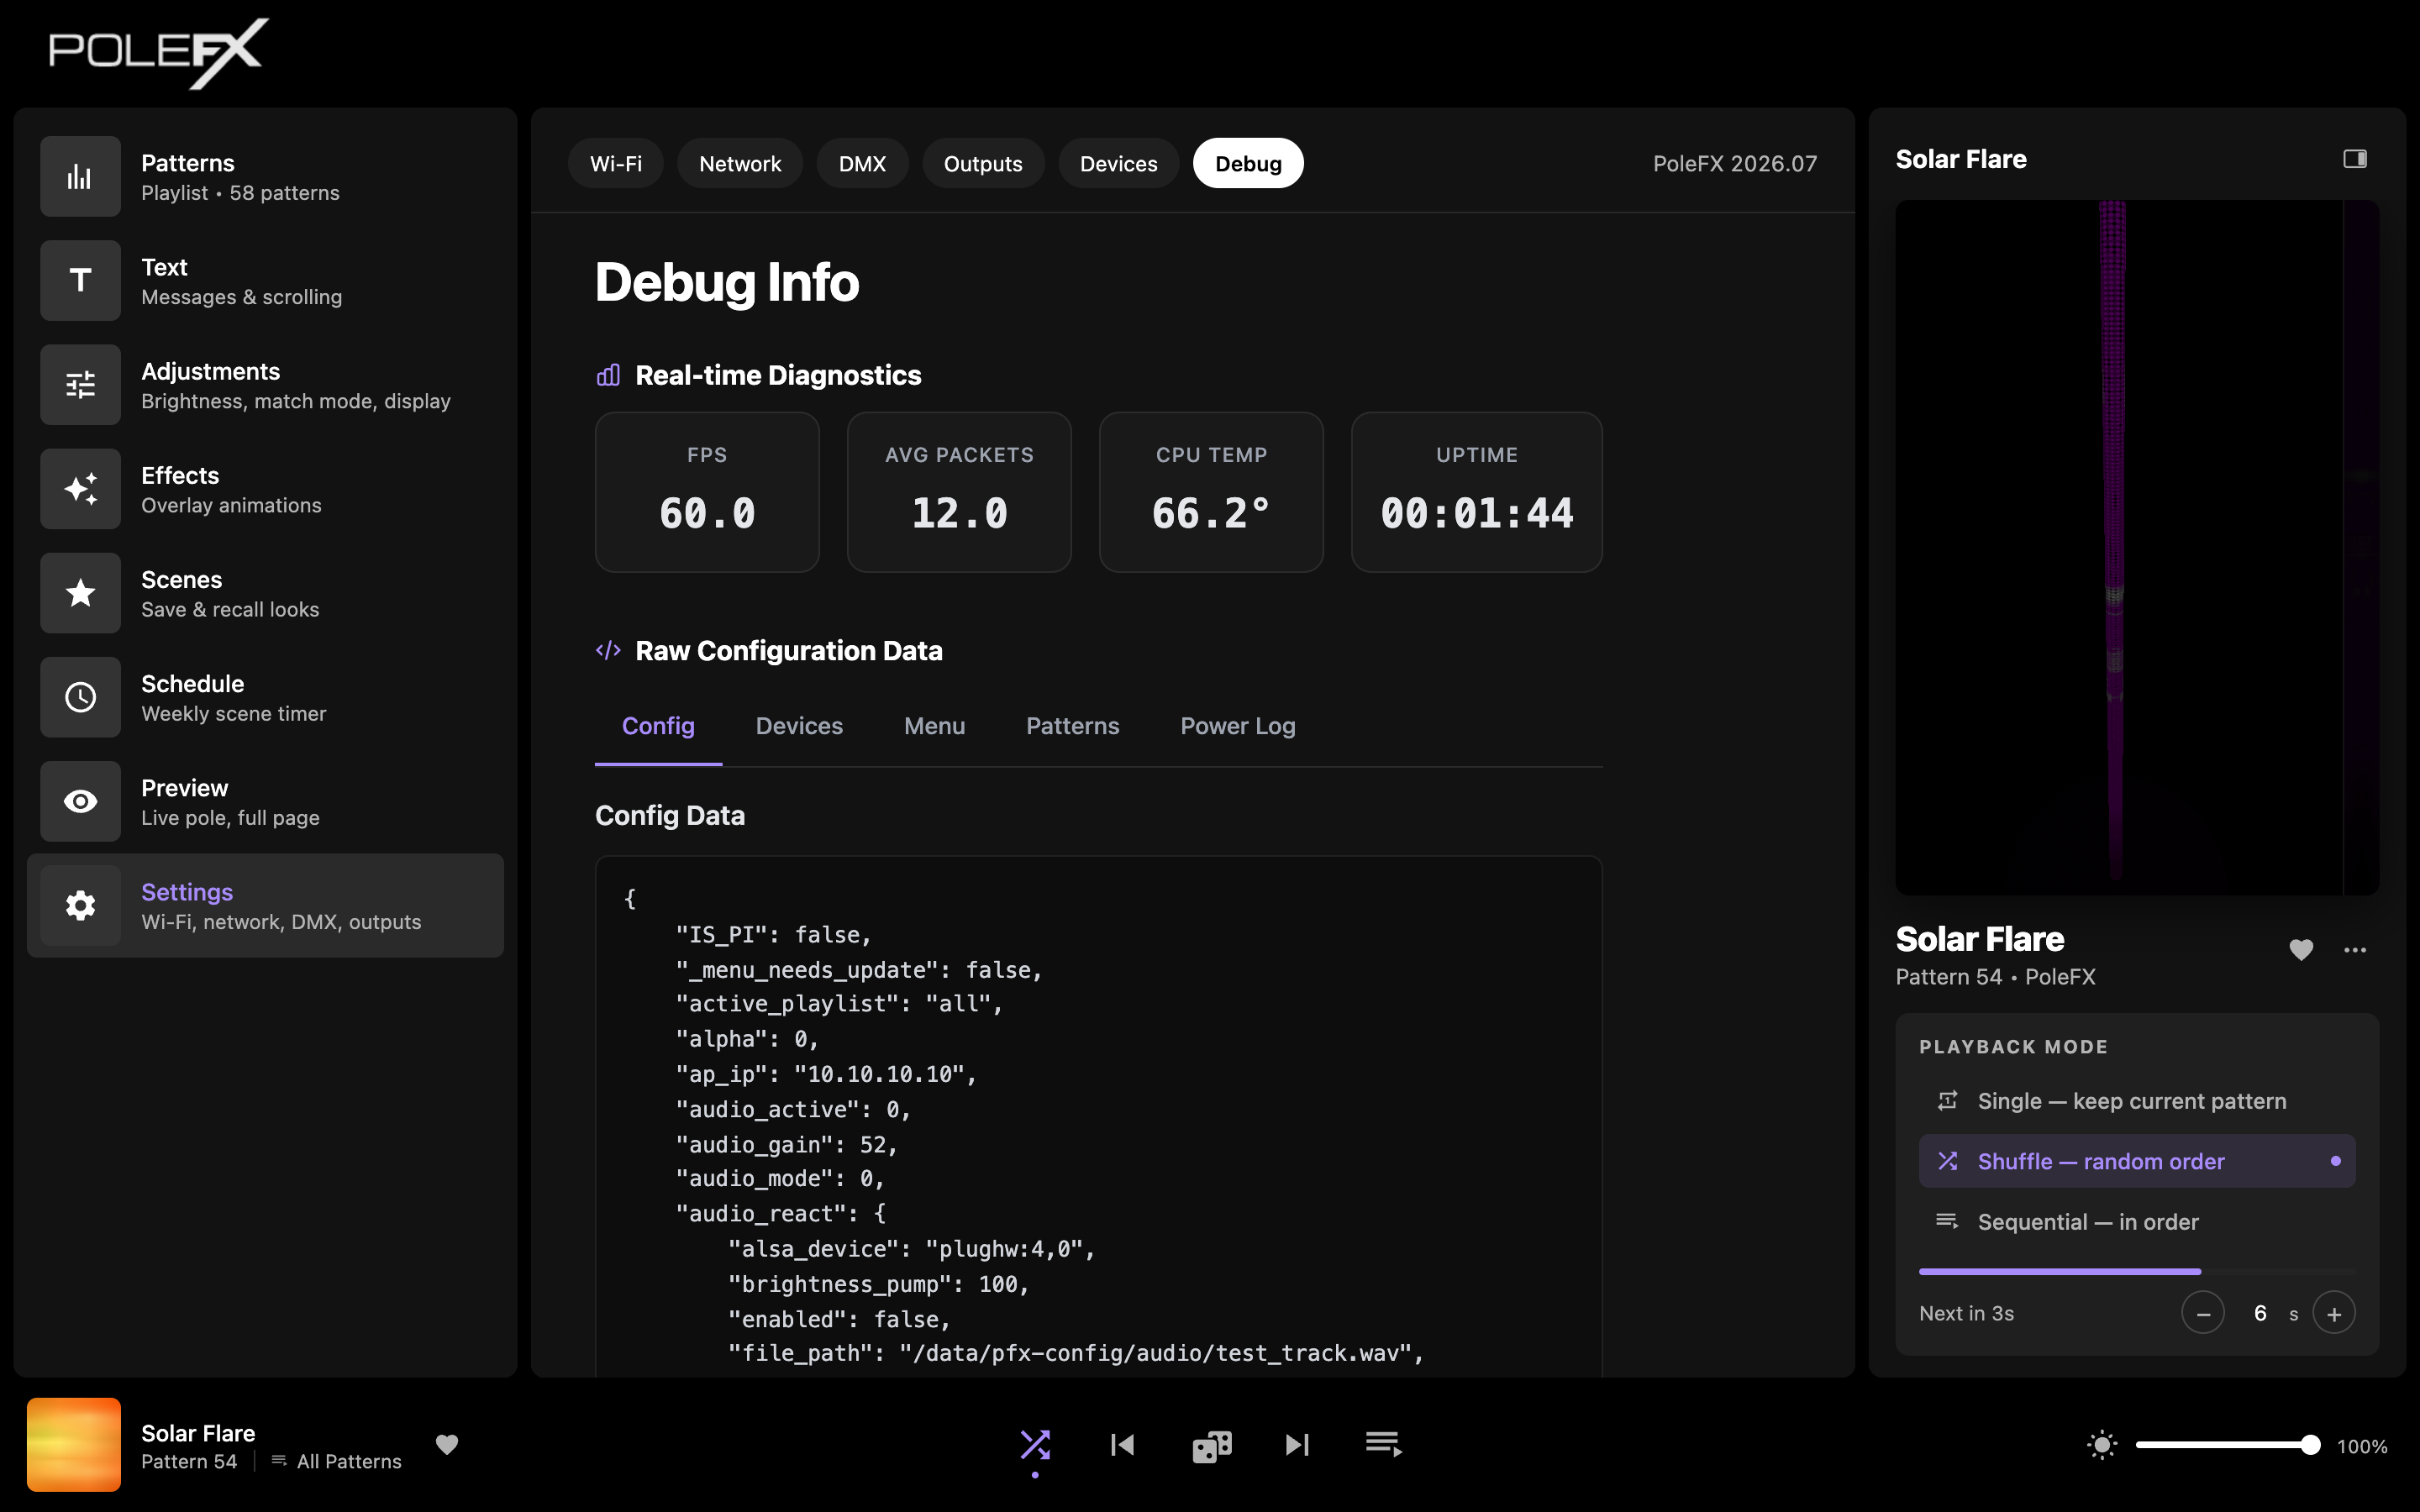
- Unsaved Counts the live values that differ from the file on disk and would be lost on a reboot. It reads Saved when the two agree.
- FPS Frames a second the player is rendering. Patterns run at 60, so a player keeping up reads close to 60.
- Avg packets Network packets per frame. The
6.0here is one pole over DDP, which sends six packets a frame; more poles and more outputs raise it. - CPU temp The temperature of the player's processor. It is here so that a support call can tell warm from hot without opening anything.
- Uptime Hours, minutes and seconds since the player last started. A small number on a unit you left running is the evidence that it restarted by itself.
- Configuration records Six tabs of stored data, all read only: Config live, Config saved, Devices, Menu, Patterns, and Power log, which is where the player records its own power warnings.
- Config live What the player is running right now, which is not always the file on disk. Config saved is the file, and the banner at the top counts the differences.
What to send when you ask for help
Support answers faster with the four or five things below than with a long description. Collect them before you write, and the first reply is an answer rather than a question.
-
Your release
Settings, System, the PoleFX software version row. It is also at the right of the tab row on every Settings tab.
You should haveA release such as
2026.07, and the feature channel shown under it. -
The device list
Settings, Devices. A screenshot of the whole table is easier than typing it out.
You should haveEvery pole the player can see, with its name, address and firmware version, or the No poles detected panel if it can see none.
-
The error itself, word for word
Copy the message, or photograph the screen. Say what you pressed just before it appeared.
You should haveThe exact wording. Most messages on the player name the field or the pole that refused, and that detail is the whole answer surprisingly often.
-
The connection log, for anything about Wi-Fi
Settings, Wi-Fi. Press Clear, save the settings again so the attempt is the only thing in the log, then copy the lines.
You should haveTimestamped lines saying what the player did and which network and address it ended on.
-
The Debug readouts
Settings, Debug. The four numbers at the top, and the Power log tab as well if the player restarts on its own or the picture stutters.
You should haveFPS, avg packets, CPU temp and uptime, copied or photographed.
-
Photographs of the hardware
The Player from the front and from the rear, then the pole's connections. Frame the whole connector face, not just the socket you suspect.
You should havePictures that show which socket each cable is in, which is the thing nobody describes correctly in words.
-
One line about the network
Whether the player is in Access point or Join network mode, whether the poles run to a switch or straight to the player, and what your phone or laptop is joined to.
You should haveA sentence like "Access point, two poles into a switch, phone on the player's own network".
CarefulDo not send your Wi-Fi password. If you photograph the Wi-Fi tab, cover the Password box first: Show beside it may have left the password on screen.
A .pfxbackup file carries your Wi-Fi network name and
password, as What is in a backup
describes. Nobody needs it to answer a question, and sending it hands over
your network. The Debug tab is the safe thing to send instead: it prints
every password as ********, so the raw configuration can be
pasted or photographed as it stands. Glance at
wifi_ap_pw and external_wifi_pw before you send it
anyway, and if either shows a real password rather than the stars, your
player predates that change and those two lines have to come out.