
Text
Display scrolling or static messages on the pole, over whatever pattern is playing.
 1
2
3
4
5
6
7
8
9
10
11
12
13
1
2
3
4
5
6
7
8
9
10
11
12
13
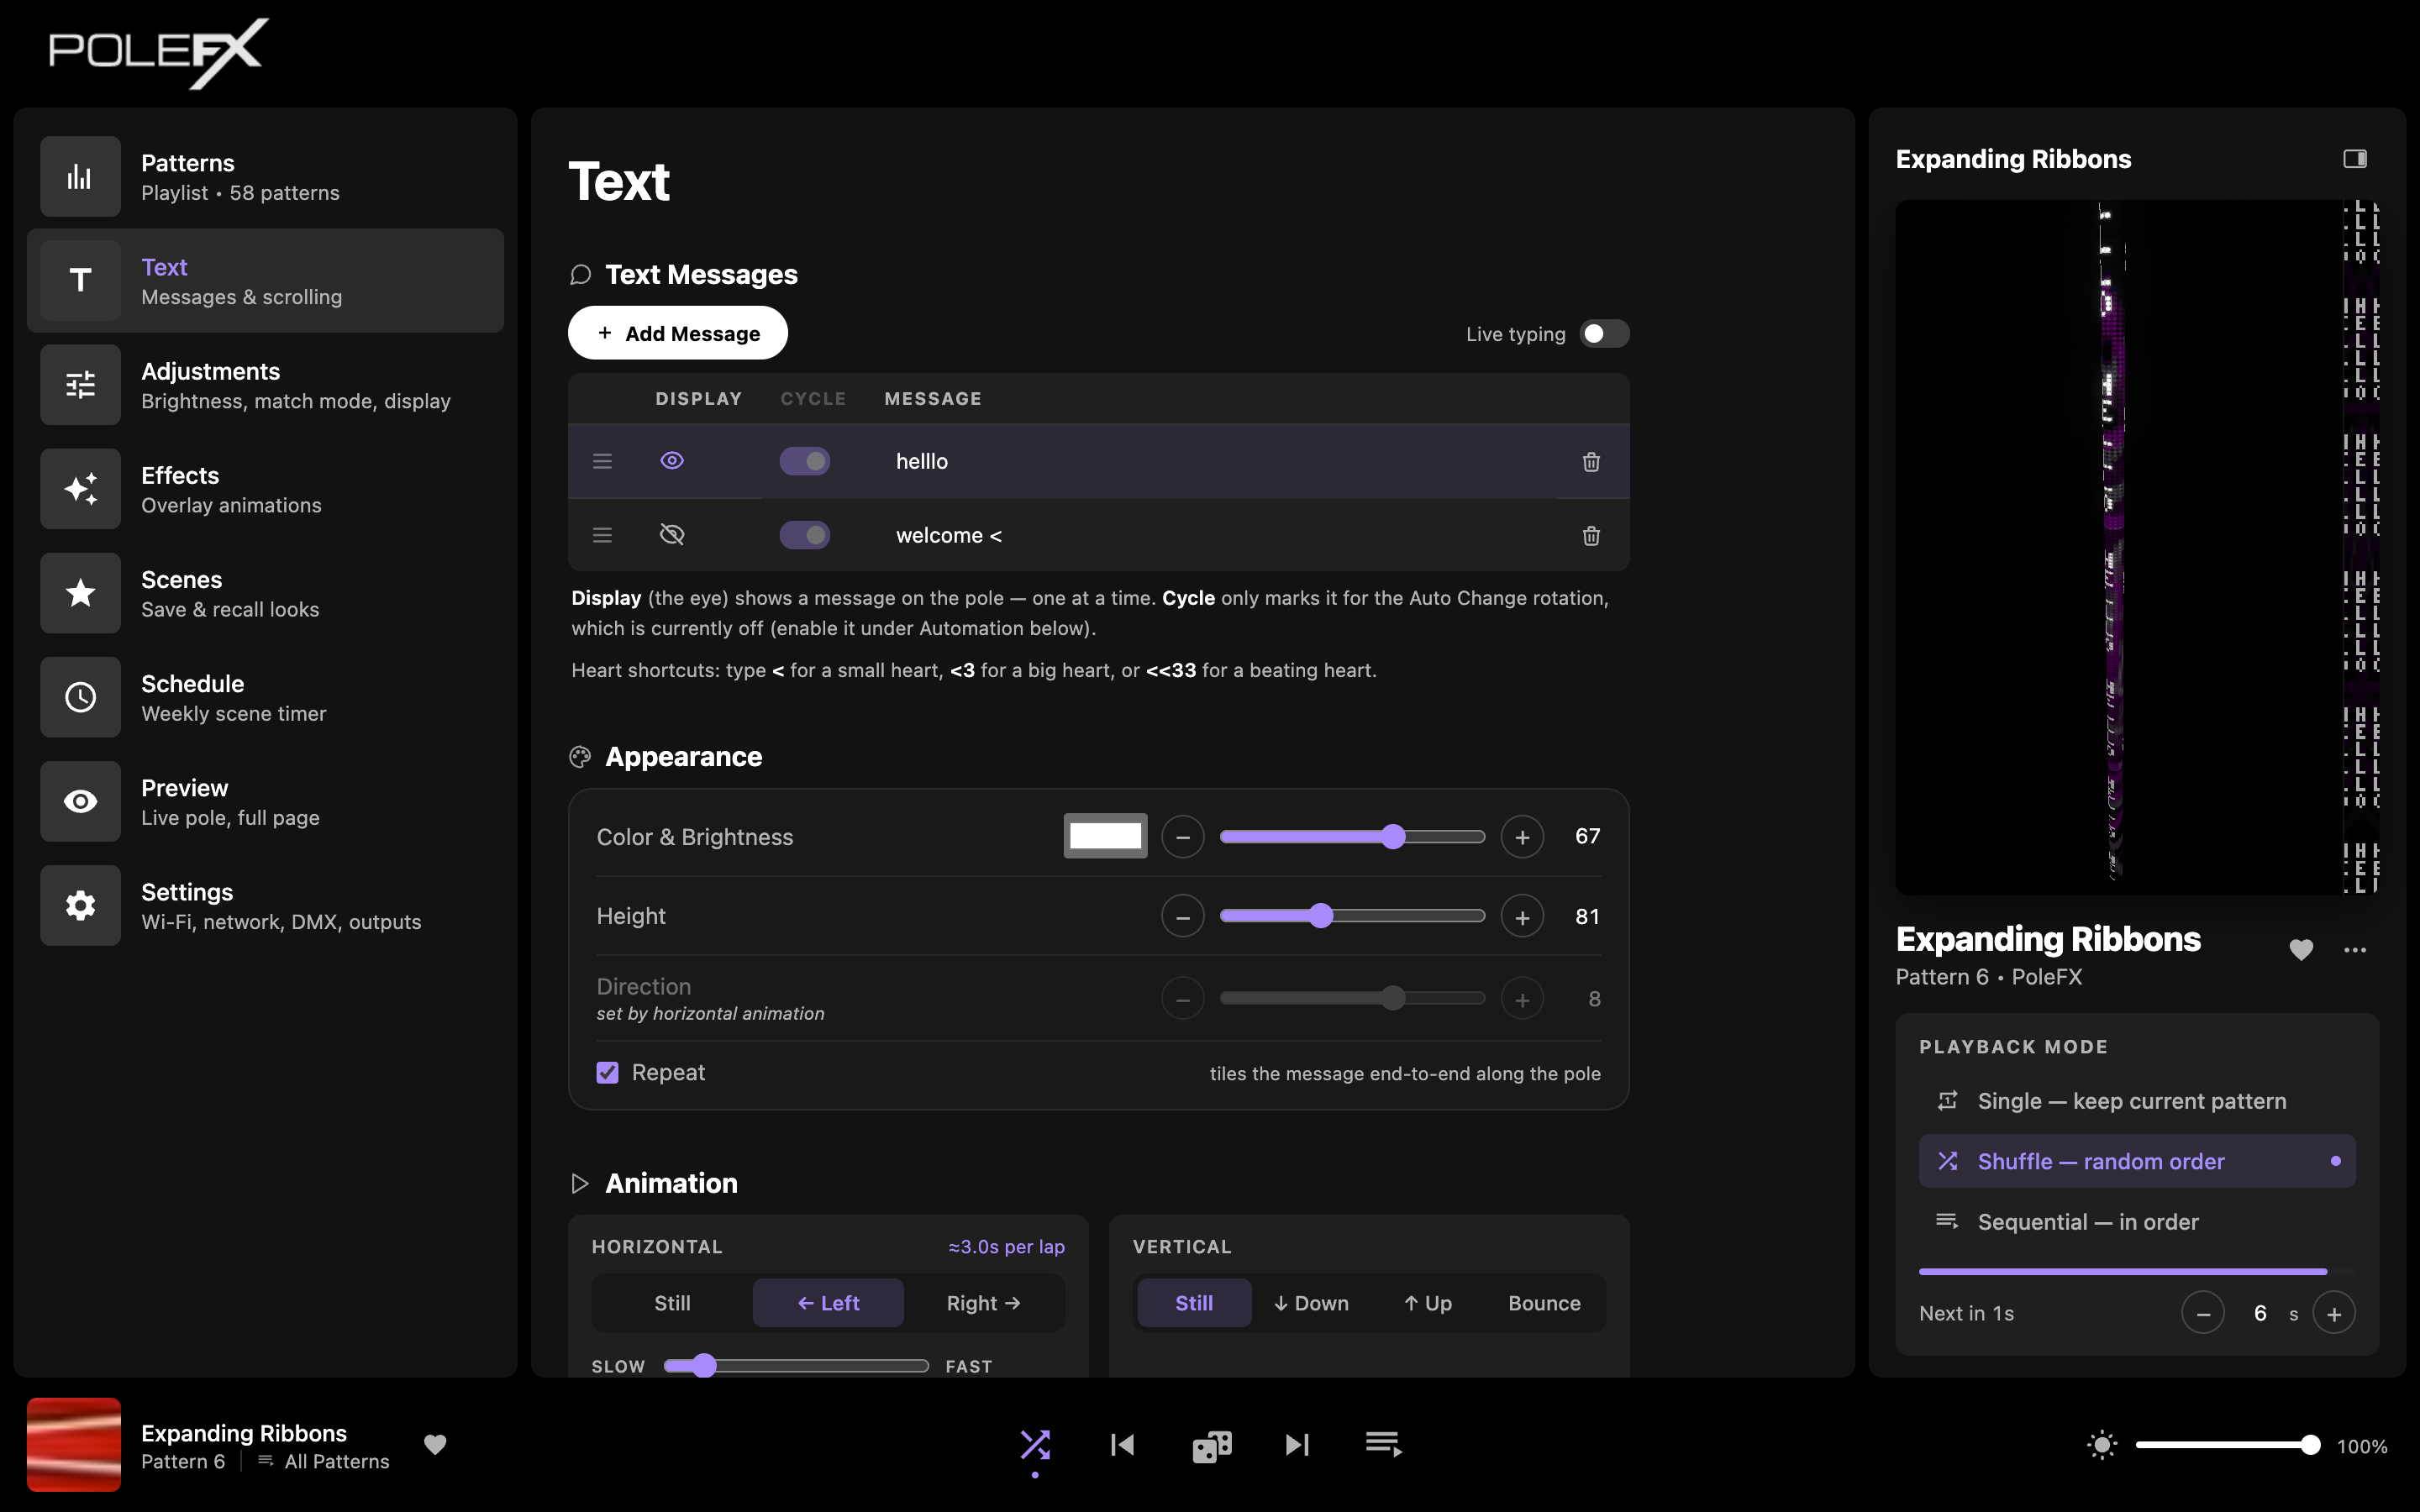
- Add Message Adds an empty row under Text messages. This is the button to use first.
- Live typing On, the pole follows every keystroke. Off, an edit reaches the pole when you leave the field or press Enter.
- Drag handle Drag a row to change the order of the list.
- Display (the eye) Shows that message on the pole. Only one message shows at a time, so switching one on switches the others off, and clicking a lit eye takes the text off the pole. The row with the lit eye is the highlighted one.
- Cycle (the switch) Marks the message for the Auto Change rotation. It changes nothing until Auto Change is on, under Automation at the foot of the page. The column heading is greyed while Auto Change is off.
- Message text Type the message in the row. The trash icon at the end of the row deletes it, and asks first. The line under the table gives the heart shortcuts.
- Color & Brightness The swatch sets the message color. The slider beside it sets how bright the message burns, 0 to 100. It is the same level as Text under Adjustments.
- Height Where the message sits along the pole. A vertical animation drives it instead while one is running: the row then dims and reads "set by vertical animation", which is what this capture shows.
- Direction Where the message sits around the pole. A horizontal animation takes it over the same way, and the row then reads "set by horizontal animation".
- Repeat Tiles the message end to end along the pole.
- Animation Three independent groups: Horizontal (Still, Left, Right), Vertical (Still, Down, Up, Bounce) and Effects (None, Pulse, Pulse Fade). Each one has its own Slow to Fast speed, which appears only while that group is running, so this capture shows one slider because only Vertical is moving. Horizontal takes over Direction above, and Vertical takes over Height.
- Auto Change Rotates through the messages marked Cycle. Off in this capture, which is why the Cycle column is greyed.
- Live preview The pole as it looks right now, text included: the message with the lit eye is the one running up the render. The full page is under Preview.
When a scene owns the text
A band can appear above the list saying a scene's text deck is playing. While it is there the messages below are your queue and they are not on the pole. Show my messages puts your list back on the pole. Copy deck here replaces your list with the scene's messages, and asks first.
Messages
+ Add Message adds a row. Each row has two controls:
- Display (the eye): show this message on the pole now. Only one shows at a time.
- Cycle: include it in the Auto Change rotation.
Drag rows to reorder. Turn on Live typing to push what you type to the pole as you type it.
-
Add a row
Press + Add Message.
You should see An empty row at the foot of the list, reading "Message text".
-
Type the message
Click the row and type. With Live typing off, the edit reaches the pole when you leave the field or press Enter. With it on, the pole follows every keystroke.
You should see The words in the row, and in the live preview once the edit lands.
-
Put it on the pole
Click the eye in that row.
You should see The eye open, the row highlighted, and every other eye closed. Only one message shows at a time.
-
Add it to the rotation
Switch Cycle on for each message you want in the rotation, then turn on Auto Change under Automation.
You should see The note beside the list stop saying that Auto Change is off, and the pole start working through the marked messages.
-
Reorder the list
Drag a row by the handle on its left.
You should see The row settle in its new place. Reordering does not change which message is on the pole.
-
Take the text off the pole
Click the eye that is lit.
You should see Every eye closed and no message on the pole. The messages are still in the list, ready to switch back on.
Three hearts have their own typing shortcuts. Type the characters into the message and the pole draws the heart in their place.
One character, one narrow heart. It works anywhere in a message, on its own or between words.
The two characters become one wider heart. Put a space between them,
< 3, and you get a small heart and a 3 instead.
The heart swaps between the big shape and a small one in the same place, so it reads as a pulse. Both shapes are the same width, so the rest of the message never shifts.
The longest shortcut wins, so <<33 is one beating heart, not
two small hearts followed by two threes. Everything else you type is drawn as
the letter or digit itself.
Appearance
- Color & Brightness: the message's color, and how bright it burns.
- Height: where the message sits along the pole.
- Direction: where the message sits around the pole.
- Repeat: tile the message end to end along the pole.
Height and Direction each hand over to their animation. While a vertical animation is running the Height row dims and reads "set by vertical animation", and a horizontal animation does the same to Direction.
Height and Repeat
Neither one changes the letters. Height decides where the message sits along the pole, and Repeat decides how many copies of it there are.
- What you set
- The Height slider near the bottom of its travel.
- What the pole shows
- One copy of the message, sitting near one end of the pole.
- Letter size
- Unchanged. No control on this page makes the letters bigger or smaller.
- Watch for
- The whole message moves as one block. Words never wrap or re-flow.
- What you set
- The same slider, further up.
- What the pole shows
- The same copy of the same message, further along the pole.
- Letter size
- Unchanged. The message has simply been placed somewhere else.
- Watch for
- The slider is switched off while a vertical animation runs, and the row says so. Set that axis back to Still to place the message by hand.
- What you set
- The Repeat checkbox, under the sliders.
- What the pole shows
- Copies of the message end to end down the whole pole, with a short gap between them.
- Letter size
- Unchanged. There are more copies, not bigger ones.
- Watch for
- Height still works with Repeat on, and slides the whole run of copies along the pole.
Animation
Three groups, each with its own speed slider that appears only once that group is doing something:
- Horizontal: Still, Left, or Right, with a speed slider (shown as the seconds in one lap of your pole).
- Vertical: Still, Down, Up, or Bounce.
- Effects: None, Pulse, or Pulse Fade. This group does not move the message, it works on its brightness. Pulse is a hard blink: full on, then fully off for the same length of time. Pulse Fade is the soft version of the same cycle, easing up, holding, and easing back out. Either one runs alongside the other two groups, so a message can travel and pulse at once.
The three are independent. Setting one to Still leaves the others running.
Which way each one moves
Unwrap a pole and you get a long strip: its length runs one way, the way around the pole runs the other, and the two long edges of the strip meet again on the real pole. The button names are what you see from where you stand. A message crossing the face of the pole looks like it is moving sideways, so those buttons are Left and Right. A message climbing the pole looks like it is moving up, so those are Up and Down.
Horizontal sends the message around the pole.
The message sits where the Direction control put it, and the Direction row stays yours to set.
The message crosses the face you are watching, carries on around the back, and returns to the front. One lap is one trip around.
The same lap, run in the opposite direction around the pole.
Vertical sends the message along the length of the pole.
The message sits where the Height control put it, and the Height row stays yours to set.
The message travels the length of the pole. When it runs off one end it comes back on at the other and keeps going.
The same trip, running the other way along the pole.
The message runs to one end of the pole and back again, slowing as it turns at each end. It reverses instead of starting over.
Each card has its own Still, so you can animate one axis and place the message by hand on the other. While an axis is animating it takes over its own control: Horizontal takes Direction, Vertical takes Height.
Speed
The speed slider appears once you pick a direction, captioned Slow at one end and Fast at the other. Beside the card title the app prints what your setting works out to. Read it, because the same slider means a different thing on each card.
- What the app prints
- The seconds in one lap: the time for the message to go all the way around the pole and come back to where it started. The lap is measured on your pole, so a pole with more columns of pixels reads a longer lap at the same speed.
- Toward Fast
- The lap gets shorter, and the two are in proportion: twice the speed is half the lap time.
- Reach for it when
- You want a message to keep sweeping past the audience rather than sit on one side of the pole.
- What the app prints
- A speed in pixels per second, not a time. How long the trip takes then depends on the length of your pole.
- Toward Fast
- The message covers the pole in proportionally less time.
- Reach for it when
- You want the message to climb or fall the length of the pole.
- What the app prints
- An estimate of the seconds in one bounce: out to the end of the pole and back.
- Toward Fast
- The bounce gets shorter, in the same proportion: twice the speed is half the bounce.
- Reach for it when
- You want movement without the message ever leaving the pole.
- What the app prints
- The seconds in one cycle: one full pulse, bright and back. It is a brightness cycle, so the pole's size does not come into it and the number is the same on every pole.
- Toward Fast
- The cycle gets shorter, in the same proportion. The middle of the slider is a little over three seconds.
- Reach for it when
- You want the message to draw the eye without moving it off where you placed it.
A lap time is worked out from the speed you set and from the pole the
Player is driving, so it holds on any generation of PoleFX pole. Generations
differ in how many
columns
of pixels go around them, and the same message crosses 8 columns sooner
than it crosses 12. The ≈ is rounding, to one decimal
place.
Two readings surprise people and are not faults. If your active outputs do not all have the same number of columns, the lap time is shown as a range, because one pole finishes the lap before the other. Different pole generations do that, and so does one output set up with a different column count on the same generation. If no output is switched on, no lap time is shown at all, because there is no pole to time.
When a scene is holding the text
If a scene put its own messages on the pole, the Text page says so in a band above the list, and your own messages wait underneath. Show my messages gives the pole back to your list. Copy deck here replaces your list with the scene's messages so you can edit from them. See Scenes.